I rarely watch food and travel shows because I dislike how I feel after—like I haven’t been anywhere at all, or eaten anything good ever. With the exceptions of the earlier Anthony Bourdain shows and David Chang’s Asian experience peppered in Ugly Delicious, most shows have the same formula and get boring after a while.

I liked Samin Nosrat’s book Salt, Fat, Acid, and Heat and so I was at least curious as to how it would be translated by Netflix. The “Fat” episode was a good pilot for me because I immediately got her style. I love when she tastes something and her honest reaction is shown. I felt like I would react the same way if I was in her position. By the time I was done with the “Salt” episode, all I wanted was to travel back to Japan and cook this soy-braised ribs recipe.

I altered her recipe to suit my timing and didn’t add the leftover marinade as part of the braising juice that you see in her original version. I simply added more dashi halfway through so as not to burn the meat while helping them cook through with all the steam.
Every time I braised meats, it almost always involves tomatoes and red wine–it’s my go-to method when the weather is colder outside. I was intrigued by this dish because it used neither of them, and the result is a much cleaner and subtler flavor, yet packed with all that umami.
Ingredients:
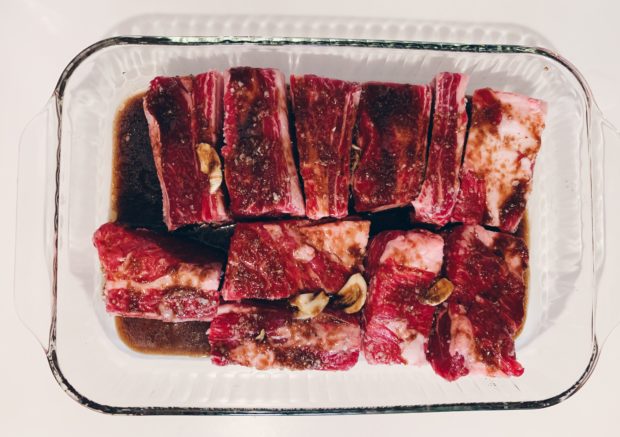
3 lbs beef short ribs on the bone, 2-3 inches thick
salt
canola oil
¼ cup soy sauce
¼ cup dark brown sugar
¼ cup mirin
1 tsp toasted sesame oil
1 tbsp fresh ginger, finely grated
4 garlic cloves, finely grated
¼ tsp cayenne
About 2 cups dashi broth made from
kombu
a handful of cilantro, finely chopped
2 scallions, chopped1. The morning you want to serve the ribs, salt them and let them sit in room temperature for 30 minutes, lightly covered. Keep in mind that the marinade consists mostly of soy sauce, which is salty, so use only about half as much salt as you otherwise would.
2. In the meantime, whisk together the soy sauce, brown sugar, mirin, sesame oil, ginger, garlic, and cayenne. Place the meat in a large bowl and pour in the marinade. I let them marinate until 4 hours before dinner time.
3. When ready to cook, preheat oven to 400°F.
4. Using a heated cast-iron skillet, add just enough oil to coat the bottom. Working in batches so as not to crowd pan, brown a few short ribs at a time on all three meaty sides, about 3-5 minutes per side.
5. Transfer the ribs, bone-side down, to a large Dutch oven, snug but in one layer. Add enough dashi to go about half an inch up the sides of the ribs, then cover with lid. Slide into the oven and cook until the liquid simmers, about 30 minutes, then reduce heat to 325°F and cook until meat is very tender and falling off the bone, 3 to 4 hours more. Check halfway to add more dashi if it’s drying up.
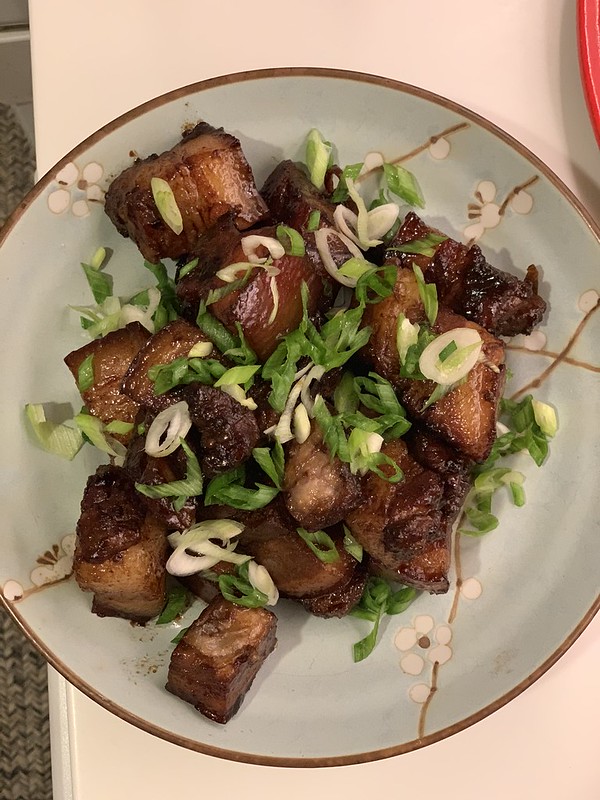
6. Serve warm with rice, garnished with cilantro and slivered scallions, and with blanched haricot verts and quick-pickled Persian cucumbers.