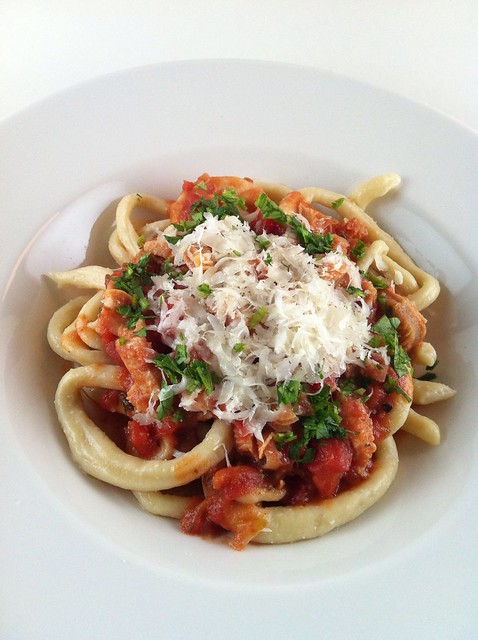
Homemade Pici Pasta with Tripe

I had to waste four cups of flour before I perfected this recipe. The first recipe I found online did not require eggs nor all-purpose flour, just semolina and water. I thought that was odd, but I gave it a try anyway. I should have trusted my instinct. The “dough” refused to stick together and just ended up becoming a shredded mess. I found another recipe that required eggs but did not list semolina, so I thought I’d combine the two instructions until the dough felt right in my hands, just like I learned in my gnocchi class last year.

And what exactly is “right”? I’m not sure if I can describe, but after I mixed the flour with the eggs, I freely sprinkled the kitchen counter with semolina and started kneading. Every time the dough got a little sticky, I dusted with more semolina to allow me to continue kneading it. I stopped until the dough felt pliable enough to cut and roll into snake-like noodles. That’s the word I was looking for! Pliable!

It took an hour to make the pici and they looked like they weren’t going to feed more than two people, but as soon as I cooked the pasta and distributed them to three deep serving dishes, I had enough for two more servings the next day. The cooked pasta was plump and I really needed just one tong-heaping for each person.

Caz Hildebrand’s The Geometry of Pasta is an awesome book about pasta with really cool illustrations.

Ingredients:
2 pounds of tripe, thawed, thoroughly washed, dried with paper towels
salt
vanilla
3 cloves of garlic, minced
1 red onion, chopped
1 can tomato sauce

For the pici pasta:
3 cups of all-purpose flour
3 eggs
1 to 1 1/4 cups of lukewarm water
olive oil
semolina flour
any hard cheese, shaved
some parsley, finely chopped

1. Prepare the tripe. Cut the tripe into smaller square sheets and cook in a large pot of boiling water with the salt and vanilla for about an hour, or until the tripe is tender. It’s okay that they are still a little chewy; just make sure it’s not rubbery. Drain and slice into smaller pieces.
2. Make the pasta while the tripe is cooking. Pour out the flour on a clean kitchen counter surface and create a hole in the middle. Crack each egg in the center of the well and mix with a fork. When the egg is mixed into the flour, begin to add a tiny bit of water at a time, each time trying to mix in as much flour as possible. When all of the flour is mixed in, begin to knead the flour. You’re going to probably do this for about 8-10 minutes. When complete, make dough into a mound and pour a teaspoon of olive oil on top. Cover with a dish towel and let it rest for 10 minutes.
2. Cut the dough into smaller pieces and roll each into thin dowels and into snake-like noodles. Place the pici on a sheet tray that has been dusted with semolina flour and cover the pasta with the dish towel. Set aside until ready to use.
3. Make the sauce. In a large pot, heat some oil. Sauté some garlic until light brown. Add the onions and sauté until translucent. Add the tripe and cook by sauteéing. Lower the heat and add the tomato sauce. Mix and simmer for 10 minutes, just enough to incorporate the tomatoes.
4. Cook the pasta. Salt a large pot of water and put over high heat until boiling. Add the pici and cook for 10 minutes or until al dente. Use tongs to remove them from the water onto deep serving dishes. Top with sauce, cheese and parsley.

Related post/s:
Homemade gnocchi the Rustico Cooking way
Tripe tacos in Sunset Park, Brooklyn

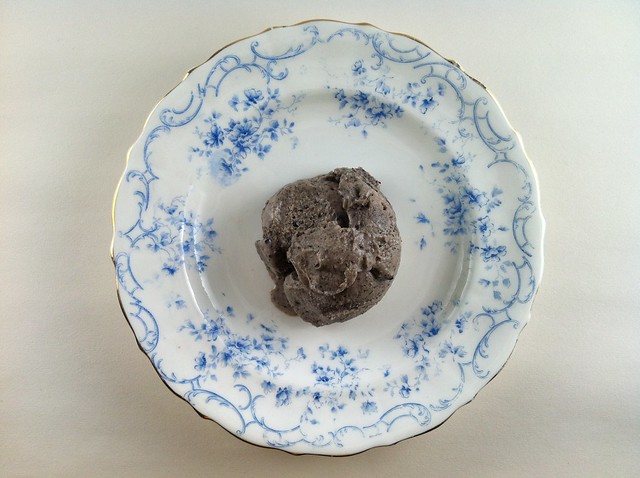
Goma, Japanese Black Sesame Ice Cream

I’m more of a savory dessert fan rather than sweet, and one of my favorites is black sesame ice cream especially after a Japanese dinner. (Green tea and earl gray flavors are included in that list.) The best black sesame I’ve had is from il laboratorio del gelato in Manhattan’s East Village, followed by whatever brand they serve at Sushiden or Sobaya.

When the time came to prepare for my Thanksgiving feast this year, I set aside a couple of hours to replicate this black sesame ice cream recipe, not as part of my menu, but as a test since I was already spending a long time in the kitchen all weekend. The original recipe noted that it was for 1.5L. I assumed that L was for liters, or about 6 cups, which was a little too much for an ice cream flavor I just wanted to test, so I cut everything in half. The problem is that I finished with an amazing ice cream that wasn’t even half a pint! So what could that L had stood for? I should have just gone for the original measurements. Listed below is the version I made–try it first, or double everything for a pint’s worth.

Ingredients:
3 tbsps black sesame seeds
1/2 cup sugar
1 egg yolk
1/4 cup, plus 2 tbsps of whole milk
1/4 cup heavy cream

1. Roast the black sesame seeds in a skillet using medium heat. Move the skillet fast and frequently to avoid burning until you can smell the roasting aroma; no more than a minute. Remove from heat. Separate a tsp’s worth for use later in the recipe if you want more texture in your ice cream. Transfer the rest to a mortar and ground with a pestle.
2. Combine the ground black sesame with half of the sugar in a bowl. Set aside. In another large bowl, whisk the remaining sugar with the egg yolk until the mixture becomes smooth and is a pale yellow color.
3. Heat the milk in a small sauce pan using medium low heat until the edges just start to bubble. Remove the milk from the heat and slowly add the milk to the sugar and yolk mixture while stirring to ensure the eggs don’t cook.
4. Make your custard base. Pour the sugar-yolk-milk mixture back into the sauce pan and heat over medium low heat. Make sure you stir constantly as the mixture thickens or else you will get lumps. Once the mixture coats the back of a wooden spoon–I spent about 20 minutes–immediately remove from the heat. Pour into another bowl using a fine mesh or strainer.
5. Prepare an ice bath. Set aside. Slowly mix the custard in with the black sesame dry mixture. Make sure you add the custard slowly and in small portions or the mixture will separate. Put this bowl in the ice bath to cool while making sure none of the water gets into the custard. When cool, add the heavy cream. If you want your ice cream to have more texture, add the remaining tsp of roasted black sesame seeds as well. Mix well with a rubber spatula.
6. Using your ice cream maker, churn the black sesame custard for about 35 minutes, or until it reaches your desired consistency. Transfer to an air tight plastic container.

Thanks to Michele for my beautiful vintage plate!

Related post/s:
Sage Ice Cream recipe
My first ever foray into baking was for rhubarb crisp

Masten Lake

285 Bedford Avenue between South 1st Street and Grand in Williamsburg, Brooklyn
718/599.5565
around $125 for 2, with 3 drinks, with tip
♥ ♥ ♥

I was talking to my friend Stacie about where we’ve both eaten lately and as we went through our list, she said, There really hasn’t been anything exciting since Momofuku Ko. I thought about this for a few seconds and I agreed. Sure, I’ve been to some good restaurants the last few months–August and Riverpark among them–but she was right: nothing has stood out. That is until I sat at the bar of Masten Lake in Williamsburg, Brooklyn.

During my first visit, there was a generous piece of fresh and unadulterated mackerel served with sour tomatillos and sunchokes with a dusting of Japanese ground spices and a hint of yuzu. It made me get up and walk towards the open kitchen to ask who was cooking that night. It wasn’t a new dish, and any mortal can buy that spice from Sunrise Mart on St. Marks Place–I just haven’t had it that way before.

My second visit was a more wintry night and my companion and I split a comfortable bowl of pici with tripe. This is definitely hand-rolled, he said while pointing at the pasta with his fork. Of course, it is; an alumna of Lupa wouldn’t have it any other way, right? Its heftiness lent itself to the subtle offal taste of the tripe; the crushed tomatoes rounded the dish off. It was a little heavy on the salt, as heavy-handed as the tagliatelle with mussels during my first visit, though the burrata with the shellfish made it more palatable. There are other, shall I say, whimsical and lighter dishes to share, which change almost nightly, like the apples with sheep’s milk cheese and foie gras with smears of melon and mascarpone. You get used to sliding and passing ceramics back and forth, creating works of food art on plates and bowls. Order several wedges of cheese and a plate of thinly-sliced lardo to compliment the easy choices of wine and nicely-made cocktails.

The next time I visit, I’ll take Stacie with me and we’ll cover our palettes with smudges and smears of the day’s freshest ingredients.

Related post/s:
Masten Lake photos on Flickr
Kale and bacon salad from Lupa
Momofuku Ko in 2008

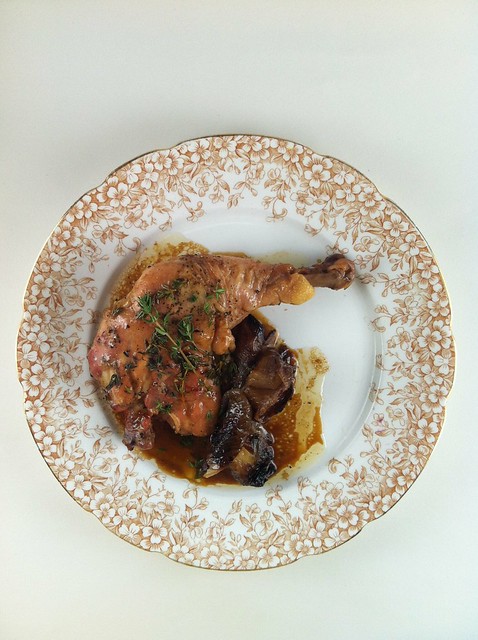
Chicken with Caramelized Shallots in Sherry Sauce

I roast chicken for myself at least once a month because there’s always a lazy, quiet day that’s perfect for a properly roasted chicken. What I didn’t know until this past weekend is that I can roast one and serve it to dinner guests. I always want to impress when I invite guests to my home and have always thought that the more work I put into cooking, the better the food. And it has been for the most part; I just never thought chicken was something that would bowl people over. With this recipe, however, using sherry vinegar sauce and then served with other dishes that included apples, it made a whole autumn feast presentable. I saved so much time cooking chicken instead of my usual repertoire that I was able to make three separate vegetable sides plus a cake for dessert!

If you have a good butcher, ask them to debone the chicken and cut in half, but leaving the legs and wings intact. You may also buy separate chicken pieces; about 3 pieces will fit into a large oven-safe skillet. If you have an iron grill press, it’s good to use it to keep the chicken pieces flat. If you only have a Teflon frying pan (which you certainly can’t put inside the oven), you’re better off using the same baking pan you’re using for the shallots just so it’s hot before cooking the chicken–just remove the shallots after roasting to avoid burning them.

I also saved the rendered fat from the chicken and for leftovers the next day. I fried some white rice and added a blob of it (there’s no better way to describe it) to make a quasi-Hainanese chicken rice. It was so delicious and guiltily satisfying with some pickled cornichon to cut through the grease.

Ingredients:
6 pieces of chicken thighs and breasts
salt and pepper
10 shallots, peeled
a stick of butter
vegetable oil
1/4 cup of sherry vinegar
thyme sprigs

1. Preheat the oven to 425º. Season the chickens generously on both sides with salt and pepper. Set aside.
2. Place the 6 of the whole shallots in a small baking pan. Toss with salt and pepper, add a medium-sized knob of butter and pour in 1/4 cup water. Cover with aluminum foil and roast for 20 minutes. Uncover and roast for 15 minutes longer or until the shallots are tender and golden. Set the pan aside.
3. When you’re ready to roast the chickens, place two oven-safe skillets in the oven for 15 minutes. When the skillets are hot, carefully remove them from the oven and add vegetable oil to each skillet. Place 3 chicken halves in each skillet, skin side down. Roast for about 30 minutes,
checking halfway through, until the juices from the thigh run clear.
4. Remove the skillets from the oven and pour off the fat in a separate container for later use. Turn the chicken pieces over, skin side up and deglaze each pan with 1/4 cup of sherry vinegar, gently scraping the bottom to release any browned bits. Add another knob of the butter, thyme and 2 shallots to each pan. Return to the oven and roast for 3 extra minutes.
6. To serve, place a chicken piece, a couple of shallots and a bit of the pan sauce on each plate. Fry some rice with the chicken fat for an Asian flair. Garnish your plates with thyme sprigs.

If you have more time and feeling like you need a challenge, why don’t you try to prepare your own chicken suprême, or a semi-boneless poultry breast half with the wing joint still attached? A new iPad app from Inkling called The Professional Chef has amazing videos and photographs from the Culinary Institute of America. Unlike cooking demos on TV, you don’t get bogged down by the screaming obnoxious white-haired guy–you can just concentrate on the cooking matter at hand with the calm narrating voice guiding you at every step. You may buy each chapter for $2.99 (Chapter 16: Fabricating Meats, Poultry, and Fish) or the entire app for less than $50 using the link below.

Recommended tool/s:
The Professional Chef iPad app from the Culinary Institute of America

Where to eat in Bangkok, Thailand: Damnoen Saduak Floating Market

My Bangkok trip this past summer was a reunion for me and my old friends from my first high school. (I say first because I moved to the States to start sophomore year.) The last time I was in the Philippines was almost three years ago when my older brother got married. I saw my good friends then but have not been back to Asia since. When the opportunity came up to visit a mutual friend living in Bangkok, we all knew we had to make our separate flights and meet there. They schlepped from Manila and I made the long trek from New York City via Frankfurt and Singapore.

You know when people say good friends just pick up where they’ve left off even after it has been a long time since they’ve seen each other? This was true with Krisan, Ria and Pat–we chatted, laughed and squealed like it’s only been a week. Sure, Facebook has made it possible now to keep each other updated, but nothing beats gathering around a table, eating and drinking in a new country. I love my girls, and this post is dedicated to all three of them.

One of the most touristy things I did during my four-day stay in Bangkok was the Damnoen Saduak Floating Market, but it was also the only thing on my list that I knew I had to experience. We were already eating pretty well, visiting public markets, tasting everything that looked good and trying out several restaurants that were recommended by other friends. At the floating market, I was like a child on Christmas morning. I couldn’t contain myself every time I saw something I haven’t tasted before. I was overwhelmed with the choices, so I ate everything.

While on a slow-moving boat that squeezed through the narrow canals avoiding collisions with other vessels, I pointed at every seller that looked like they were cooking and selling something interesting. Most of them were! Each point was followed by a vendor who rowed towards us or hooked their long canes to our boats to bring us closer and to keep us both steady so we could do some business. We spoke English and they spoke Thai, but we all understood the language of food.

I expected prepared goods to be on sale, but I didn’t expect boats outfitted with kerosene gas tanks deep-frying vegetables and hot coals grilling skewered meats. There were boats filled with fruits I grew up with but haven’t had a chance to eat again since I left Asia: balingbings or star fruits, lanzones, rambutans, atis or sugar apples, chicos, mangosteens and guavas. I also didn’t expect the best coconut ice cream from a boat with its own creamery on board. There were boats selling Pad Thai noodles that don’t even compare to the laughable version they have here in America, vegetable salads sprinkled with the most fresh and fragrant basil and mint leaves, sprouts and spring rolls up the wazoo with killer Thai chiles in different kinds of dipping sauces, sticky rice wrapped in banana leaves you eat by cupping it with the small palm of your hand… I could go on, but my mouth is watering just trying to remember how my stomach grumbled at every sight of food, mysterious or familiar.

You can only imagine how hot and humid it is in Thailand during the month of August. It was sweltering when we visited and we were drenched in sweat while trying to keep up with all the food around us. The vendors were mostly covered in straw hats and long-sleeved shirts, but funnily enough, with caked-on makeup to look good (or scary) in photographs.

The heat didn’t stop me from buying hot soup from the lady who expertly chopped duck meat off a carcass and assembled bowls after bowls in less time than I could set my camera to shoot. Indecipherable Thai was thrown from vendor to vendor and everyone efficiently served those of us with bottomless stomachs. You’d order from one lady and walk around with your camera to take more photographs, and in a few seconds, she’d motion for you to come and sit down to eat even if there were hundreds of other people there ordering at the same time. Thai baht were exchanged as if in a rowdy stock market, but I always somehow got the correct change.

The entire market was a blow to all my senses and I mean that in the best way possible. Thai food will never be the same for me ever again.

Related post/s:
Damnoen Saduak Floating Market photos on Flickr