• For 2012, I told myself that I would go back to writing. This week, when I returned from my Christmas-birthday and New Year trip in San Francisco, I immediately got back to cooking. It wasn’t just to eat; it was to start updating this Web site as soon as possible to keep up with that resolution.

    While in San Francisco, I cooked beef stew for a family of five who was renting a house by the ocean in Montara, a few miles away from downtown and minutes away from beautiful Pacifica. I only had a couple of hours to feed all of us–we were all tired from our respective full day–so I felt like I didn’t deliver as much as I could have if I had more time or if I was cooking in my apartment back in New York City with all the necessary equipment. They ate the food though, and I honestly think they enjoyed it; or they were just really being polite!

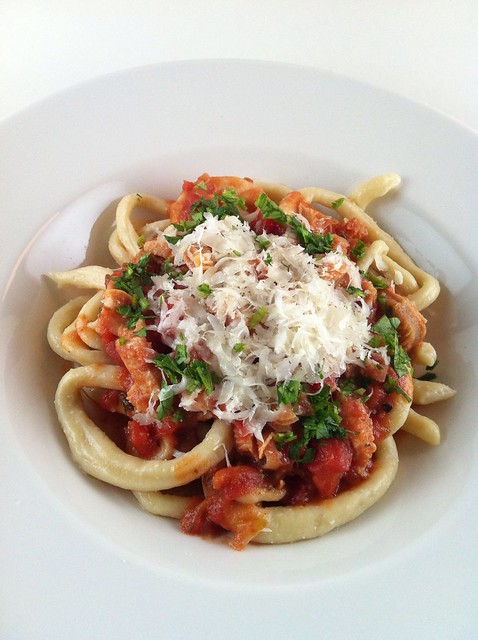
    To make up for that shortcoming that’s still eating me a little bit inside, I asked an Armenian co-worker for a tried and true winter stew recipe. He emailed me a rough draft of this lamb and orzo recipe and I put my own spin to it when I got home. While I was cooking, I remembered that back in 2006, I had started this mini-project to cook as many traditional family recipes from people I know who hail from different countries.Unfortunately, I stopped updating it in 2008, but now I have another excuse to go back to writing.

    I don’t know much about Armenia. Okay, I know nothing besides what I learned from Ararat, the 2002 movie about the genocide. But even my co-worker blames his too-American father for knowing more about Chinese culture (his wife is Chinese) than his own. When he visits his family in Colorado, this dish is one to be served during their stay. They save it for special occasions–perhaps because lamb was more expensive to procure back in the day–but also because it was hearty and brought the family together.

    I now wish I can get another chance to cook for that same family in Montara so I may redeem myself, impress a little bit more and bring the members back together again.

    Ingredients:
    1 stick of butter, cut in quarters
    1 1/5 lbs of lamb stew cuts
    salt
    pepper
    1 yellow onion, minced
    beef broth
    3 tomatoes, chopped
    1 large green pepper, seeded, chopped
    1 15-ounce can of tomato purée
    2 cups of orzo pasta

    1. In a large heated Dutch oven, add the butter until browned and almost melted. Add and brown the lamb pieces on all sides. Season with salt and pepper. Add the onions and mix until translucent. Cover the pot and cook for 1 hour in low heat.
    2. Check after the first 25 minutes and add a splash of beef broth so that the meat doesn’t burn or stick to the pot. Gently stir with a wooden spatula. Repeat after the next 25 minutes to avoid burning. Add the tomatoes and the bell pepper after the hour is up and cook for another 30 minutes. Add another splash of broth after the first half of the 30 minutes to avoid burning the vegetables.
    3. Boil some water in a separate pot and set aside. Uncover the Dutch oven and add the tomato purée to the lamb and vegetables. Slowly add some hot water splash by splash, or until you have the desired consistency. Your stew must be somewhat saucy, not too thick but not too watery either.
    4. Raise the heat to medium-high. Add the orzo and cook by constantly stirring everything with your spatula, about 10 minutes or until the pasta is al dente. Feel free to add a jig or two of the hot water to make sure your sauce does not thicken too much. Season with more salt as necessary. Turn off the stove and cook the pasta for the last 2 minutes with the remaining heat by stirring some more.

    Related post/s:
    Cooking the World: Global Gastronomy

  • I had to waste four cups of flour before I perfected this recipe. The first recipe I found online did not require eggs nor all-purpose flour, just semolina and water. I thought that was odd, but I gave it a try anyway. I should have trusted my instinct. The “dough” refused to stick together and just ended up becoming a shredded mess. I found another recipe that required eggs but did not list semolina, so I thought I’d combine the two instructions until the dough felt right in my hands, just like I learned in my gnocchi class last year.

    And what exactly is “right”? I’m not sure if I can describe, but after I mixed the flour with the eggs, I freely sprinkled the kitchen counter with semolina and started kneading. Every time the dough got a little sticky, I dusted with more semolina to allow me to continue kneading it. I stopped until the dough felt pliable enough to cut and roll into snake-like noodles. That’s the word I was looking for! Pliable!

    It took an hour to make the pici and they looked like they weren’t going to feed more than two people, but as soon as I cooked the pasta and distributed them to three deep serving dishes, I had enough for two more servings the next day. The cooked pasta was plump and I really needed just one tong-heaping for each person.

    Caz Hildebrand’s The Geometry of Pasta is an awesome book about pasta with really cool illustrations.

    Ingredients:
    2 pounds of tripe, thawed, thoroughly washed, dried with paper towels
    salt
    vanilla
    3 cloves of garlic, minced
    1 red onion, chopped
    1 can tomato sauce

    For the pici pasta:
    3 cups of all-purpose flour
    3 eggs
    1 to 1 1/4 cups of lukewarm water
    olive oil
    semolina flour
    any hard cheese, shaved
    some parsley, finely chopped

    1. Prepare the tripe. Cut the tripe into smaller square sheets and cook in a large pot of boiling water with the salt and vanilla for about an hour, or until the tripe is tender. It’s okay that they are still a little chewy; just make sure it’s not rubbery. Drain and slice into smaller pieces.
    2. Make the pasta while the tripe is cooking. Pour out the flour on a clean kitchen counter surface and create a hole in the middle. Crack each egg in the center of the well and mix with a fork. When the egg is mixed into the flour, begin to add a tiny bit of water at a time, each time trying to mix in as much flour as possible. When all of the flour is mixed in, begin to knead the flour. You’re going to probably do this for about 8-10 minutes. When complete, make dough into a mound and pour a teaspoon of olive oil on top. Cover with a dish towel and let it rest for 10 minutes.
    2. Cut the dough into smaller pieces and roll each into thin dowels and into snake-like noodles. Place the pici on a sheet tray that has been dusted with semolina flour and cover the pasta with the dish towel. Set aside until ready to use.
    3. Make the sauce. In a large pot, heat some oil. Sauté some garlic until light brown. Add the onions and sauté until translucent. Add the tripe and cook by sauteéing. Lower the heat and add the tomato sauce. Mix and simmer for 10 minutes, just enough to incorporate the tomatoes.
    4. Cook the pasta. Salt a large pot of water and put over high heat until boiling. Add the pici and cook for 10 minutes or until al dente. Use tongs to remove them from the water onto deep serving dishes. Top with sauce, cheese and parsley.

    Related post/s:
    Homemade gnocchi the Rustico Cooking way
    Tripe tacos in Sunset Park, Brooklyn

  • I’m more of a savory dessert fan rather than sweet, and one of my favorites is black sesame ice cream especially after a Japanese dinner. (Green tea and earl gray flavors are included in that list.) The best black sesame I’ve had is from il laboratorio del gelato in Manhattan’s East Village, followed by whatever brand they serve at Sushiden or Sobaya.

    When the time came to prepare for my Thanksgiving feast this year, I set aside a couple of hours to replicate this black sesame ice cream recipe, not as part of my menu, but as a test since I was already spending a long time in the kitchen all weekend. The original recipe noted that it was for 1.5L. I assumed that L was for liters, or about 6 cups, which was a little too much for an ice cream flavor I just wanted to test, so I cut everything in half. The problem is that I finished with an amazing ice cream that wasn’t even half a pint! So what could that L had stood for? I should have just gone for the original measurements. Listed below is the version I made–try it first, or double everything for a pint’s worth.

    Ingredients:
    3 tbsps black sesame seeds
    1/2 cup sugar
    1 egg yolk
    1/4 cup, plus 2 tbsps of whole milk
    1/4 cup heavy cream

    1. Roast the black sesame seeds in a skillet using medium heat. Move the skillet fast and frequently to avoid burning until you can smell the roasting aroma; no more than a minute. Remove from heat. Separate a tsp’s worth for use later in the recipe if you want more texture in your ice cream. Transfer the rest to a mortar and ground with a pestle.
    2. Combine the ground black sesame with half of the sugar in a bowl. Set aside. In another large bowl, whisk the remaining sugar with the egg yolk until the mixture becomes smooth and is a pale yellow color.
    3. Heat the milk in a small sauce pan using medium low heat until the edges just start to bubble. Remove the milk from the heat and slowly add the milk to the sugar and yolk mixture while stirring to ensure the eggs don’t cook.
    4. Make your custard base. Pour the sugar-yolk-milk mixture back into the sauce pan and heat over medium low heat. Make sure you stir constantly as the mixture thickens or else you will get lumps. Once the mixture coats the back of a wooden spoon–I spent about 20 minutes–immediately remove from the heat. Pour into another bowl using a fine mesh or strainer.
    5. Prepare an ice bath. Set aside. Slowly mix the custard in with the black sesame dry mixture. Make sure you add the custard slowly and in small portions or the mixture will separate. Put this bowl in the ice bath to cool while making sure none of the water gets into the custard. When cool, add the heavy cream. If you want your ice cream to have more texture, add the remaining tsp of roasted black sesame seeds as well. Mix well with a rubber spatula.
    6. Using your ice cream maker, churn the black sesame custard for about 35 minutes, or until it reaches your desired consistency. Transfer to an air tight plastic container.

    Thanks to Michele for my beautiful vintage plate!

    Related post/s:
    Sage Ice Cream recipe
    My first ever foray into baking was for rhubarb crisp

  • 285 Bedford Avenue between South 1st Street and Grand in Williamsburg, Brooklyn
    718/599.5565
    around $125 for 2, with 3 drinks, with tip
    ♥ ♥ ♥

    I was talking to my friend Stacie about where we’ve both eaten lately and as we went through our list, she said, There really hasn’t been anything exciting since Momofuku Ko. I thought about this for a few seconds and I agreed. Sure, I’ve been to some good restaurants the last few months–August and Riverpark among them–but she was right: nothing has stood out. That is until I sat at the bar of Masten Lake in Williamsburg, Brooklyn.

    During my first visit, there was a generous piece of fresh and unadulterated mackerel served with sour tomatillos and sunchokes with a dusting of Japanese ground spices and a hint of yuzu. It made me get up and walk towards the open kitchen to ask who was cooking that night. It wasn’t a new dish, and any mortal can buy that spice from Sunrise Mart on St. Marks Place–I just haven’t had it that way before.

    My second visit was a more wintry night and my companion and I split a comfortable bowl of pici with tripe. This is definitely hand-rolled, he said while pointing at the pasta with his fork. Of course, it is; an alumna of Lupa wouldn’t have it any other way, right? Its heftiness lent itself to the subtle offal taste of the tripe; the crushed tomatoes rounded the dish off. It was a little heavy on the salt, as heavy-handed as the tagliatelle with mussels during my first visit, though the burrata with the shellfish made it more palatable. There are other, shall I say, whimsical and lighter dishes to share, which change almost nightly, like the apples with sheep’s milk cheese and foie gras with smears of melon and mascarpone. You get used to sliding and passing ceramics back and forth, creating works of food art on plates and bowls. Order several wedges of cheese and a plate of thinly-sliced lardo to compliment the easy choices of wine and nicely-made cocktails.

    The next time I visit, I’ll take Stacie with me and we’ll cover our palettes with smudges and smears of the day’s freshest ingredients.

    Related post/s:
    Masten Lake photos on Flickr
    Kale and bacon salad from Lupa
    Momofuku Ko in 2008

  • I roast chicken for myself at least once a month because there’s always a lazy, quiet day that’s perfect for a properly roasted chicken. What I didn’t know until this past weekend is that I can roast one and serve it to dinner guests. I always want to impress when I invite guests to my home and have always thought that the more work I put into cooking, the better the food. And it has been for the most part; I just never thought chicken was something that would bowl people over. With this recipe, however, using sherry vinegar sauce and then served with other dishes that included apples, it made a whole autumn feast presentable. I saved so much time cooking chicken instead of my usual repertoire that I was able to make three separate vegetable sides plus a cake for dessert!

    If you have a good butcher, ask them to debone the chicken and cut in half, but leaving the legs and wings intact. You may also buy separate chicken pieces; about 3 pieces will fit into a large oven-safe skillet. If you have an iron grill press, it’s good to use it to keep the chicken pieces flat. If you only have a Teflon frying pan (which you certainly can’t put inside the oven), you’re better off using the same baking pan you’re using for the shallots just so it’s hot before cooking the chicken–just remove the shallots after roasting to avoid burning them.

    I also saved the rendered fat from the chicken and for leftovers the next day. I fried some white rice and added a blob of it (there’s no better way to describe it) to make a quasi-Hainanese chicken rice. It was so delicious and guiltily satisfying with some pickled cornichon to cut through the grease.

    Ingredients:
    6 pieces of chicken thighs and breasts
    salt and pepper
    10 shallots, peeled
    a stick of butter
    vegetable oil
    1/4 cup of sherry vinegar
    thyme sprigs

    1. Preheat the oven to 425º. Season the chickens generously on both sides with salt and pepper. Set aside.
    2. Place the 6 of the whole shallots in a small baking pan. Toss with salt and pepper, add a medium-sized knob of butter and pour in 1/4 cup water. Cover with aluminum foil and roast for 20 minutes. Uncover and roast for 15 minutes longer or until the shallots are tender and golden. Set the pan aside.
    3. When you’re ready to roast the chickens, place two oven-safe skillets in the oven for 15 minutes. When the skillets are hot, carefully remove them from the oven and add vegetable oil to each skillet. Place 3 chicken halves in each skillet, skin side down. Roast for about 30 minutes,
    checking halfway through, until the juices from the thigh run clear.
    4. Remove the skillets from the oven and pour off the fat in a separate container for later use. Turn the chicken pieces over, skin side up and deglaze each pan with 1/4 cup of sherry vinegar, gently scraping the bottom to release any browned bits. Add another knob of the butter, thyme and 2 shallots to each pan. Return to the oven and roast for 3 extra minutes.
    6. To serve, place a chicken piece, a couple of shallots and a bit of the pan sauce on each plate. Fry some rice with the chicken fat for an Asian flair. Garnish your plates with thyme sprigs.

    If you have more time and feeling like you need a challenge, why don’t you try to prepare your own chicken suprême, or a semi-boneless poultry breast half with the wing joint still attached? A new iPad app from Inkling called The Professional Chef has amazing videos and photographs from the Culinary Institute of America. Unlike cooking demos on TV, you don’t get bogged down by the screaming obnoxious white-haired guy–you can just concentrate on the cooking matter at hand with the calm narrating voice guiding you at every step. You may buy each chapter for $2.99 (Chapter 16: Fabricating Meats, Poultry, and Fish) or the entire app for less than $50 using the link below.

    Recommended tool/s:
    The Professional Chef iPad app from the Culinary Institute of America

  • My Bangkok trip this past summer was a reunion for me and my old friends from my first high school. (I say first because I moved to the States to start sophomore year.) The last time I was in the Philippines was almost three years ago when my older brother got married. I saw my good friends then but have not been back to Asia since. When the opportunity came up to visit a mutual friend living in Bangkok, we all knew we had to make our separate flights and meet there. They schlepped from Manila and I made the long trek from New York City via Frankfurt and Singapore.

    You know when people say good friends just pick up where they’ve left off even after it has been a long time since they’ve seen each other? This was true with Krisan, Ria and Pat–we chatted, laughed and squealed like it’s only been a week. Sure, Facebook has made it possible now to keep each other updated, but nothing beats gathering around a table, eating and drinking in a new country. I love my girls, and this post is dedicated to all three of them.

    One of the most touristy things I did during my four-day stay in Bangkok was the Damnoen Saduak Floating Market, but it was also the only thing on my list that I knew I had to experience. We were already eating pretty well, visiting public markets, tasting everything that looked good and trying out several restaurants that were recommended by other friends. At the floating market, I was like a child on Christmas morning. I couldn’t contain myself every time I saw something I haven’t tasted before. I was overwhelmed with the choices, so I ate everything.

    While on a slow-moving boat that squeezed through the narrow canals avoiding collisions with other vessels, I pointed at every seller that looked like they were cooking and selling something interesting. Most of them were! Each point was followed by a vendor who rowed towards us or hooked their long canes to our boats to bring us closer and to keep us both steady so we could do some business. We spoke English and they spoke Thai, but we all understood the language of food.

    I expected prepared goods to be on sale, but I didn’t expect boats outfitted with kerosene gas tanks deep-frying vegetables and hot coals grilling skewered meats. There were boats filled with fruits I grew up with but haven’t had a chance to eat again since I left Asia: balingbings or star fruits, lanzones, rambutans, atis or sugar apples, chicos, mangosteens and guavas. I also didn’t expect the best coconut ice cream from a boat with its own creamery on board. There were boats selling Pad Thai noodles that don’t even compare to the laughable version they have here in America, vegetable salads sprinkled with the most fresh and fragrant basil and mint leaves, sprouts and spring rolls up the wazoo with killer Thai chiles in different kinds of dipping sauces, sticky rice wrapped in banana leaves you eat by cupping it with the small palm of your hand… I could go on, but my mouth is watering just trying to remember how my stomach grumbled at every sight of food, mysterious or familiar.

    You can only imagine how hot and humid it is in Thailand during the month of August. It was sweltering when we visited and we were drenched in sweat while trying to keep up with all the food around us. The vendors were mostly covered in straw hats and long-sleeved shirts, but funnily enough, with caked-on makeup to look good (or scary) in photographs.

    The heat didn’t stop me from buying hot soup from the lady who expertly chopped duck meat off a carcass and assembled bowls after bowls in less time than I could set my camera to shoot. Indecipherable Thai was thrown from vendor to vendor and everyone efficiently served those of us with bottomless stomachs. You’d order from one lady and walk around with your camera to take more photographs, and in a few seconds, she’d motion for you to come and sit down to eat even if there were hundreds of other people there ordering at the same time. Thai baht were exchanged as if in a rowdy stock market, but I always somehow got the correct change.

    The entire market was a blow to all my senses and I mean that in the best way possible. Thai food will never be the same for me ever again.

    Related post/s:
    Damnoen Saduak Floating Market photos on Flickr

  • Okay, let’s divide and conquer. As soon as Ari said those words, I immediately knew I was with the right people to eat with at Singapore’s Golden Mile Food Centre. I had done my online research before I flew to Singapore fron New York City and noted the stalls that were must-visits and the dishes that were must-tastes for several bloggers. Without prior knowledge of the Centre’s floor plan, Golden Mile could be overwhelming. It was during lunch hour and the place buzzed; queues sometimes stretched 10-people deep, which is pretty long for a stall that could only fit one or two cooks inside. For such a minimal staff, though, they worked like efficient conveyor belts setting up bowls after bowls and distributing just the right amount of each ingredient with precision.

    Past the altar with incense burning and plates of food being offered to Hungry Ghosts for the month of August, my friends saved a table as I doled out assignments: Hainanese chicken rice from Stall B135 to Ari, beef noodles from Stall 01-89 to my brother and lormee from Stall 01-100 to Thalia. I owned the fried fish with bihon from Stall 01-101. We had char siu and kway teow on the list from Stalls 01-70 and 01-91 respectively, but both stalls were closed. To make up for those dishes, we tried the Indian-Muslin sup tulang on the basement level. To wash everything down, we drank the ubiquitous Tiger beer and tried the fresh sugar cane juice.

    Are you sitting down? Check out the photos below and try not to lick your screen.

    Lor mee
    A complicated-looking bowl of soup that includes flat fried dumplings, fish cake and hard-boiled eggs in a thick and starchy gravy made out of cornstarch. The lor mee, or the yellow flat noodles, actually get overpowered in this dish, and to me, the sauce was much better with white rice.

    Fried Fish with Bihon
    No one at our table was excited about this dish as much as I was. When I was in line waiting for my order, the lady asked me, Meer? I didn’t understand her until she pointed to the can of evaporated milk on the counter. (Throughout my stay in the country, I had problems understanding the locals’ English with Chinese and British intonations.) I asked her if she recommended milk and she poured just enough in the broth to make it cloudy. The fish pieces were airy and crisp, and the bihon, or rice stick noodles, were a good addition to the lightness of the soup.

    Beef Noodles
    Don’t be fooled by its boring name. The soup is not as thick as the lor mee‘s, but the pieces of thinly sliced beef made this so nice and hearty. The fried fish balls with the crumbled peanuts and chives completed the look. It’s a beauty:

    Hainanese Chicken Rice
    If I have access to this good of a Hainanese chicken rice here in New York City, I wouldn’t mind eating it everyday, but I don’t. The Nyonya restaurant version in our Chinatown is bony, and the rice tastes and looks like chicken bouillon was involved instead of cooking the rice in a master stock. In Singapore, the rice is oily–as it should be–and the flavor has more depth.

    Sup Tulang
    The bright red-dyed mutton bones that gained notoriety on TV after Anthony Bourdain sucked the marrow out of them using a straw. I prefer getting the marrow out by holding a bone with my left hand and then tapping my wrist with my right. But then again, I also prefer my marrow served with finely chopped red onions and parsley on a nicely toasted baguette.

    The Golden Mile Food Centre is at 505 Beach Road and is open from 10am until 10 at night. You must go on an empty stomach.

    Related post/s:
    Golden Mile Food Centre in Singapore photos on Flickr

  • Seventeen miles later, I had everything I needed to replicate this recipe from Gabrielle Hamilton of Prune, one of my favorite restaurants here in New York City: one whole rabbit from Ottomanelli and a pint of cornichons from Fairway. I had woken up very late that Saturday, so after I decided that rabbit was going to be the night’s dinner, I biked to the butcher in the upper east side after a loop around Central Park to make up for my non-day. Ottomanelli’s unfortunately did not have cornichons, so I had to nervously cross town and go to Fairway where I knew a tub of cornichons is always available. I almost got doored on York Avenue and a turning cab cut me off on First that by the time I reached the west side, I was just glad to be alive. The adventure continued as my bike bag flew off its clipping on 125th Street and a guy in a Zip car had to tell me about it. Biking back to where my bag landed, a man helped me put it back on my bike rack. It was heavy and he just had to ask, What’s in there? I laughed and said, A rabbit.

    Rabbit legs pre-ordered from a reputable butcher works best for this recipe, but if you can only get a whole rabbit, make sure it’s already been cleaned. The skin under the belly was a little gnarly even for me, so I sliced it off and cleaned off the innards that were kept intact. Chopping the whole rabbit into large pieces was easy with my new Santoku knife sent to me by Wusthof. Not only was it very sharp and made slicing through the rabbit’s tiny bones easy, its new blue handle is lighter yet still hefty for fast cutting. A row of beveled ovals on the edge of the blade prevented the meat from adhering to it and minimized the drag that most cleavers have; butterflying the front part of the body was so easy and so was separating the hind legs from the rest.

    Ingredients:
    1 whole rabbit, cleaned, thawed if previously frozen, chopped in large pieces
    salt
    pepper
    olive oil
    4 large shallots, thinly sliced
    1 pint of cornichons including brining juice
    1/4 cup white vinegar
    3 cups chicken stock, or as needed
    4 tablespoons butter, cut into pieces
    a handful of parsley, finely chopped

    1. Pat the rabbit pieces dry and season with salt and pepper. Heat some oil in a large Dutch oven over high heat. Brown the rabbit pieces on both sides. Transfer to a plate.
    2. Reduce the heat to medium-low and add the shallots to the pot. Sauté until tender, but not browned, while gently scraping off the browned bits from the bottom of the pot.
    3. In the meantime, heat oven to 350º. When onions are tender, add the cornichons, brine and vinegar and let simmer. Return the rabbit with the accumulated juices. Add enough chicken stock so that it’s within 1/2-inch of covering the meat. Bring to a boil and then turn off the heat.
    4. Cover the pot and braise in the oven until the rabbit meat is tender and the leg joints bend easily, about 30 minutes. Transfer legs to a plate and keep warm. Skim cornichons and shallots from the sauce and set aside.
    5. Return pot to medium-high heat, and boil until sauce is reduced by about half. Whisk in butter a piece at a time and adjust salt and pepper to taste. Return rabbit, cornichons and shallots to the pan until just reheated. Stir in parsley.

    Related post/s:
    Buy Gabrielle Hamilton’s book

  • Do you ever crave salty food? Last weekend, when I opted to stay in and take cat naps in between eating, all I wanted was salty food. Throughout the Two Days of Nothing, I caught up with Words with Friends games I’ve neglected, organized my music files on Spotify (well, I tried to) and endlessly snacked on leftovers and cooked small easy dishes to fulfill my meal requirements.

    This pasta dish is one of those easy ones. I used spaghetti because it’s all I had in my pantry, but I think bucatini works better for its thickness. I sure hope you keep jars of anchovy fillets in your kitchen–they’re very useful for salad dressings, sandwiches and pasta dishes like this one. You can go all fancy and get the Italian brands that cost more than $10 for a small jar, or find a small can of it for less than $3 at your local grocery store. I prefer the anchovy fillets in olive oil, but the ones in water will do if you just drain them before adding to the dish.

    Ingredients:
    a fist of spaghetti or bucatini
    salt
    oil
    4 cloves of garlic, minced
    a small jar of anchovy fillets in olive oil
    red pepper flakes
    a handful of arugula
    parsley

    1. Bring a large pot of water to a boil with some salt.
    2. While waiting for the pasta to cook al dente, heat up some oil in a deep skillet on the next burner. Sauté the garlic in medium heat and then add the anchovies. Sprinkle in some red pepper flakes. When the garlic sizzles and the anchovies break up, turn the heat down to low.
    3. The pasta should be al dente at this point. Transfer the pasta to the skillet using tongs. Toss to combine the anchovy with the pasta. Drizzle in some of the pasta water to avoid drying it up. Add the arugula and the parsley and turn off the heat. Cook the greens in the remaining heat. Add salt if necessary.

    Related post/s:
    Make an awesome tuna sandwich with your leftover anchovy
    I love the chewy anchovy side dish in New Malaysia restaurant

  • Francine was coming over from Connecticut for brunch so I wanted to bake something that would bring back the Stockholm memories we shared together earlier this year. This traditional Christmas bread, or lussekatt, gets its yellow-orange color from saffron threads and is baked into S-shapes with raisins. They’re yeasty–a big plus to me–but also sweet (I cut down the sugar by half) and good with tea in the late afternoon. Of course, it’s the middle of summer here in New York City and Francine brought a bottle of Belvedere Bloody Mary vodka to mix drinks, but just like our Sweden trip, brunch broke all established rules.

    I made other alterations to this Saveur Magazine recipe besides cutting down the sugar. I didn’t let the S-shaped dough sit for another 30 minutes while I preheated the oven. I also didn’t mix the beaten egg with a splash of water before brushing the tops with it. I’m not a baker, so I didn’t notice the difference: my saffron buns turned out pretty well. I think the Swedish gnomes would be proud.

    Ingredients:
    2 1/4 oz packages of active dry yeast
    2 cups whole milk, heated until warm to the touch
    2 tsps saffron threads
    1/4 cup plus 1 tsp sugar
    6 1/2 cups flour
    3/4 tsp salt
    3 eggs
    12 tbsps unsalted butter, room temperature, and cut into 1/2-inch cubes
    golden raisins

    1. In the bowl of a stand mixer fitted with a paddle, mix together yeast, milk, saffron and 1 tsp of sugar. Let sit until foamy, about 10 minutes. Stir in remaining sugar, flour, salt and 2 eggs. Mix on low until dough forms and gathers around the paddle.
    2. Replace the paddle attachment with the dough hook and add butter. Knead on medium-high speed until dough pulls away from the sides of the bowl, 8 minutes.
    3. Grease a large glass bowl with butter. Transfer dough to the greased bowl and cover with Saran wrap. Let sit in a warm place until it doubles in size, about 1 hour.
    4. Divide dough into small pieces and roll each piece into a medium-length rope. Form each rope into an S-shape and then roll each end into a tight spiral. Place buns 2 inches apart on two baking sheets lined with parchment paper. Place raisins at the center of each spiral.
    5. Preheat oven to 400º while lightly beating the remaining egg. Brush each bun with beaten egg. Bake until buns are golden brown and cooked through, 15 minutes.

    Related post/s:
    Our travel story in Stockholm, Sweden
    Wow, a 2005 recipe for Swedish meatballs

  • A few weeks ago, I decided that the only way I would bake more is if my heavy KitchenAid mixer is actually taking up real estate on top of the kitchen counter. That way, it can stare and taunt me: Bake, bake, bake! I realized that whenever I have the urge to bake, I fall into the lazy hole after I open the cabinet door that keeps the mixer: I have to carry that big thing out of there? Never mind. But I’ve baked twice in the last couple of weeks and so far I’m amazed at how easy it is to knead the dough and transfer it into a bowl to let it rise. The cleanup of all the mixer parts was what always made me stay away from baking–not so anymore.

    A few months ago, I planted several shiso leaf seeds I bought from the Kitazawa Seed Company. I knew they would grow easily and I imagined a lot of sashimi wraps during the summer months. I now have more shiso than I need, so when I found a photo of scallion-cilantro buns from a magazine, I thought I would adapt the recipe since they’re not as spicy as what you usually eat in Japanese restaurants. Perhaps it was the growing condition in my garden–the humidity and summer thunderstorms have changed the way my shiso leaves taste. The one improvement I would make if I bake these buns again is to add a sprinkling of rock salt on top of each.

    You can get fresh shiso leaves from your favorite Japanese grocery store, but perilla or sesame leaves are great substitutes and would be less pricey and tangy.

    Ingredients:
    2 tsps active dry yeast
    2 tsps salt, divided
    2 tsps sugar, divided
    1 3/4 cups plus 3 tbsps all-purpose flour
    4 tbsps unsalted butter, chilled, cubed
    1 large egg, plus 1 yolk
    2 cups shiso leaves, julienned, then finely chopped
    1/2 cup sesame seeds
    1 tbsp black sesame seeds
    olive oil

    1. Line a baking sheet with parchment paper. Sprinkle yeast, 1 tsp salt and 1 tsp sugar in a small bowl with warm tap water. Let stand until mixture bubbles, about 10 minutes.
    2. Place flour, butter, remaining 1 tsp salt and remaining 1 tsp sugar in bowl of a stand mixer with dough hook attached. Rub in butter with fingertips until mixture resembles coarse meal. Beat in egg, extra yolk and the yeast mixture, scraping down sides.
    3. Knead on medium speed until dough is soft and smooth, about 5 minutes. Form dough into a ball; transfer to a large, lightly oiled bowl. Cover and let rise until doubled in size, about 1 hour.
    4. When ready to bake, preheat oven to 350º. Mix shiso with the sesame seeds in a small bowl. Using a rolling pin, roll dough into a rectangle. Spoon shiso mixture evenly onto center and spread mixture to corners of dough. Working from one short edge, roll dough rectangle into a cylinder.
    5. Cut cylinder into 3/4″ dough swirls. Transfer dough swirls to prepared baking sheet; brush with oil. Bake until golden brown, no more than 30 minutes.

    Related post/s:
    Making your own maki rolls
    Shiso oil recipe

  • I feel like my kitchen’s been neglected the last two weeks. It’s full-blown summer time and I haven’t been home early enough to make dinner during the week nor have I been in the city the past two weekends. When it was time to clean up the fridge and the pantry, I saw frozen pork chops in the freezer and some leafy green thing swimming in some sort of pickle juice which turned out to be preserved mustard greens. (I swear those are not the weirdest things you can find in my kitchen.) I honestly had no idea when I bought the pickles, but it didn’t look nor smell too bad when I cut the packaging open. I popped the chops and defrosted them in the microwave to prepare them for the only dish I can think of: breaded pork chops inspired by Excellent Pork Chop House, the restaurant across the Chinatown post office here in New York City.

    When I used to work in Chinatown, it was one of our lunch spots. When I used to take the Fung-Wah bus to Boston back in the day to visit my friend, Mo!, for the Head of the Charles, I would hastily eat a bowl of Taiwanese pork chops with pickled mustard greens before boarding the long WiFi-less ride out of the city. A bowl with rice cost less than $5 and it was definitely better than the Popeye’s the other passengers ate on the bus. (Ah, Chinatown memories!)

    Growing up in the Philippines, cornstarch was more familiar than flour. Breaded-anything used cornstarch; it also made Chinese-style sauces thicker. Cornstarch is so old school, it brings a smile to my face just thinking about it. It’s so old school, I smiled when I saw that I had a small container of it in my pantry. I can’t remember what I first bought it for but I was glad I had it for these pork chops because it’s always more feathery than flour for breading. (So okay, it might have gone past its expiration date, but it looked fine!) I wanted these chops to be lighter than fried chicken because I didn’t want to deep-fry; I merely wanted to pan-fry and cook the meat through by pressing on them with my cast iron grill press.

    I served the chops by slicing them in thick strips after letting them rest, but not cutting all the way through so I could fan them before placing them on top of the rice. The mustard greens went on the side with the last of my pickled ramps. A quick splash of the frying oil and pickle juice on the rice completed the whole setup.

    Ingredients:
    4 tbsps soy sauce
    3 cloves of garlic, minced
    2 tbsps sugar
    a splash of white wine
    4 tbsps five-spice powder
    8 bone-in pork chops
    cornstarch
    peanut oil

    1. In a large glass bowl, combine all the ingredients except the pork chops, cornstarch and oil. Mix together until the sugar and spices are completely dissolved. Marinate the pork chops for a couple of hours or overnight, turning them to make sure both sides are coated with the marinade.
    2. When ready to fry, remove the pork chops from the marinade onto a plate. Using a small sieve, sprinkle a few taps of cornstarch on each pork chop with one hand while shaking off excess with the other so as not to make the coating too thick. Do this for the other side of the chops.
    3. Heat some peanut oil in a large skillet. Add the breaded pork chops. Put the cast iron grill press on top to keep them flat. Turn chops once and cook until both sides are golden brown and the meat is cooked through. Remove to a strainer on a plate and let rest for 5 minutes. Slice in thick strips without cutting all the way through so you can fan each chop on top of a bowl of hot rice. Serve with pickled mustard greens.

    Related post/s:
    Pork Chops and Beer
    Pork Chops with Summer Cherries