Chickpea-Squash Coconut Curry

There’s a more elaborate procedure of this recipe, but for the sake of you busy people, I’ve published the shortcut version. If you do have several hours ahead of time, you can soak fresh chickpeas in water rather than using those that come in a Goya can. You can also buy the pre-cut butternut squash and save your energy from peeling and chopping it. A jar of preserved lemon can now be bought at Whole Foods in their Mediterranean aisle, though if you read this site often, you know I’m a big fan of pickling my own. As for spices, the ingredients list is long, as most curry-based dishes are, but I can vouch that skipping the mustard seeds is the only thing that’s forgivable. Double up on the cilantro if you don’t have coriander seeds handy. (But why not, I beseech you!) Leftover coconut milk and cilantro may be poured and added to your rice to make your carbs more fragrant before the grains come to a simmer.

Ingredients:
2 stalks of lemongrass, tender parts minced
1 knob of ginger, peeled, chopped
4 cloves of garlic, minced
peanut oil
1 red onion, finely chopped
a dash or two of turmeric powder
1 tbsp coriander, grounded
1 tsp mustard seeds, toasted
a pinch of chiles
1 can of chickpeas, washed, drained
1 butternut squash, peeled, chopped in manageable pieces
vegetable broth
1 preserved lemon, chopped
salt
1 cup of coconut milk
cilantro, roughly chopped

1. Put lemongrass, ginger and garlic in a food processor and pulse to a paste. Set aside. Alternately, you can use your mortar and pestle for this; just make sure you keep your lemongrass large enough so you can pick them off before serving.
2. In a large Dutch oven, heat oil and cook onions until soft and translucent. Add the lemongrass-ginger-garlic paste and fry in low to medium fire until fragrant. Avoid burning.
3. Add the turmeric, coriander, mustard seeds and chiles. Sauté until well-mixed. Add chickpeas and squash with enough broth so that the squash are halfway submerged. Cook in a low simmer until squash is tender but not easily mashed.
4. Add preserved lemon and season with salt. Mix in coconut milk to thicken the broth slightly. Add cilantro and simmer for another 5 minutes until everything is well incorporated. Serve with warm rice.

Related post/s:
Preserved Lemons recipe
Try a similar recipe with your favorite white fish
A Goan curry recipe using pork

Staying in a Treehouse in Santa Cruz, California

Kara handed us two empty plastic quart yogurt containers from Trader Joe’s: If you have to go in the middle of the night and you don’t feel like getting out of the treehouse. I looked at my travel partner to quietly tell him that there was no way I’ll be squatting and peeing right next to him while he slept tonight! Even if he paid for dinner! And thus, our Santa Cruz adventure to welcome 2012 officially began.

I didn’t grow up in the Philippines in a hut; in fact, quite the opposite surrounded by concrete and marble. But I remember climbing a lot of trees and getting in trouble with our nannies and parents for it. I also remember flat bamboo beds tucked in a nook inside my grandmother’s house in the province of Pampanga for cool afternoon naps during the summer. In the last 10 years of my travel life, I’ve stayed in all sorts of places: old castles in Ireland, yurts in Big Sur, tents in Patagonia, clay houses in Tunisia and 3-sided huts in Isla Bastimentos where you wake facing the open sea, but nothing has made me feel like a kid again more than this treehouse in Santa Cruz, California.

Renting the treehouse was my first Airbnb experience. Working for a tech and business publishing company, I’ve read the bad press about the Web site, but I was willing to give it a shot when we were looking for a place to stay a few hours outside of San Francisco. Santa Cruz is a California beach town and it’s teeming with small hotels situated near the boardwalk and the ocean, but I wanted to share a unique experience with my new travel partner and have a different story to tell upon returning to New York City.

I immediately started emailing with Claudine, the treehouse owner, as soon as she approved of the date I wanted to rent the treehouse for. I paid the nightly rate and a $100 deposit was put on hold in my credit card for incidentals. What makes the treehouse even more quirky is that it had been built on a homeowner’s backyard. We laughed with half giddiness and half nervousness when we drove around the downtown area of Santa Cruz and realized that we would be sleeping 30 feet up above the neighbors’ private homes. Kara was taking care of the main house during the holidays, so I only had the pleasure of making arrangements with Claudine via email and SMS, but both were so welcoming that even this New Yorker softened up a bit. We entered their hippie-centric home to use the bathroom at night and in the morning, but we pretty much stayed up in the treehouse before and after New Year’s Eve dinner.

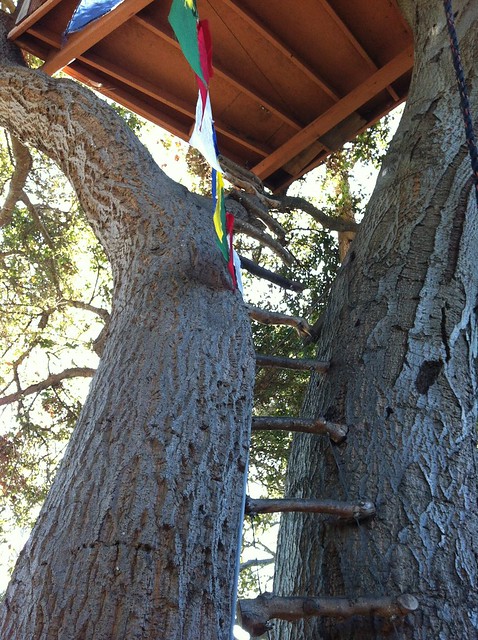
A very sturdy cable wire was installed to make climbing up and down the treehouse stable and easy. Even in the dark, before retiring for the night, we were pretty comfortable going up with just my headlamp illuminating our way. (Kara also lent us a flashlight when she gave us our pee cups!) A trapdoor let us in and we just had to carefully hoist ourselves up to be fully inside. A twin-sized bed was on the left and a narrow side table on the right, plus a floor cushion, but not much else other than finger paintings on the wall. One side was painted with splatters of red, a Jackson Pollock attempt perhaps, but unfortunately looked like gunshot wounds. (Ah, west coast self-expression!)

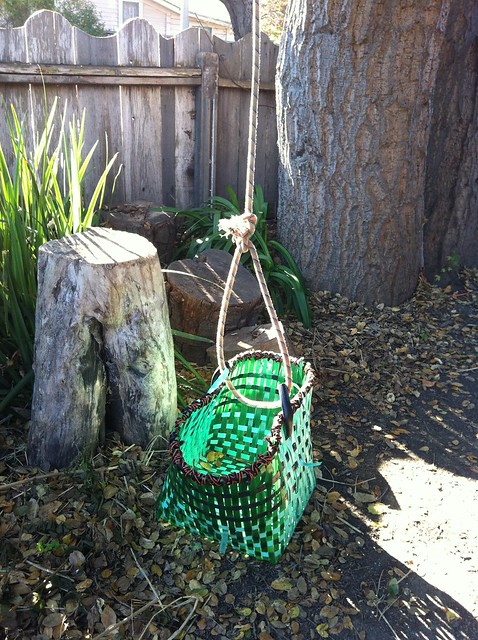
Besides the Tibetan flags outside the treehouse, my favorite was the plastic basket that was attached to an industrial pulley to help us bring our stuff up. Being the OCD person that I am, I packed our own comforter and my much-loved bamboo flat sheets from 3,000 miles away. (Seriously.) There was no heat the night of our stay and we were much too scared to light candles inside, so we mostly kept ourselves warm throughout the night using, well, body heat. Taking into consideration how cold I felt sleeping inside a tent in Kilimanjaro just two years ago, the “cold” California temperature was harmless.

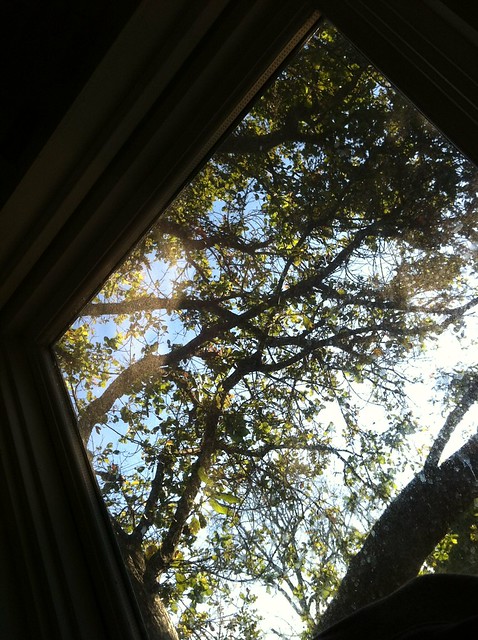
A few hours of sleep later, we caught the first sign of sunlight from a small window right above the bed. Maybe people were slowly enjoying their mornings, but the street was very quiet. For a few minutes, we forgot that there was an entire neighborhood right below us waking up for their first breakfast of the new year.

I only had a vague idea of my partner’s travel sensibilities because of the circumstances of how we first met, so I was quite worried of how he would react to this experience. Would he be picky? Would he be freaked out? At the end of our stay, he let me know that he also enjoyed our time in Claudine’s treehouse and appreciated the fact that I tried to find a different kind of place to wake up in for our first trip alone together. I wouldn’t mind traveling with this one again.

Thanks, Kara and Claudine!

Related post/s:
San Francisco and Santa Cruz photos on Flickr
Rent Claudine’s treehouse when you’re in Santa Cruz, California

Vegetarian Lasagna with Eggplant

Can you believe I made something without meat? It’s not some kind of new year resolution or anything, I just really need to use the pesto sauce I made last year that’s been sitting in the fridge for what seemed like forever. I couldn’t believe it was still good! (This dish fed 5 people and no one got sick!)

I don’t have any experience with lasagna except for the fact that I have to create layers to make it look legit. (“Lasagne” refers to multiple sheets of pasta; “lasagna” refers to the dish or to individual sheets of pasta.) The steps here were pretty much common sense, but I had no idea how the besciamella sauce texture was supposed to be like. I felt like my version was too watery after I imagined it to have more of a ricotta cheese consistency. To be honest with you, I’m not even sure it’s necessary here. My pesto was so good that I barely tasted the besciamella to know that it made any difference. (Don’t tell the lasagna police!) Why don’t you try it without? The olive oil absorbed by the eggplant was enough to keep the dish rich and moist. Buy a good quality jar of pesto from your local farmer’s market and you barely have to lift a finger to make this dish.

Ingredients:
1 box of wavy lasagna pasta
salt
olive oil
1 medium eggplant, thinly sliced
cooking spray
1 cup of besciamella sauce
1 cup pesto sauce
1 cup Pecorino Cheese, grated
1/2 cup bread crumbs

For the besciamella sauce:
3 tbsps butter
2 tbsps flour
2 cups milk
salt
nutmeg

1. Bring a large pot of water to a boil and add about 2 tbsps of salt. Prepare a bowl of ice water. Cook the lasagne sheets in the boiling water 2 minutes less than the package instructions recommend. Drain, put in the ice bath and separate each sheet by hanging them off your colander rim.
2. Heat olive oil over medium fire in a large sauté pan. Add eggplant in batches and cook until golden brown and soft, about 5 minutes. Feel free to keep adding olive oil for each batch. Drain on a paper towel and set aside.
3. Make besciamella sauce. Heat butter in a medium sauce pan until melted. Add flour and stir until smooth. Cook over medium heat until light golden brown, about 7 minutes. Meanwhile, heat the milk in a separate pot until just about to boil. Add milk to butter mixture 1 cup at a time, whisking continuously until very smooth and bring to a boil. Cook 30 seconds and remove from heat. Season with salt and nutmeg. Set aside.
4. Preheat oven to 400º. While oven is preheating, prepare lasagna. Coat a 13×9 baking pan by spraying with cooking spray. Layer 4 sheets of lasagne on the bottom of the pan. They can overlap. Top with 6 slices of eggplant and 3 tablespoons of besciamella sauce. Repeat the step for another layer, but this time, add 3 tbsps of pesto sauce. Repeat these 2 layers for a total of 4 layers. End with 4 sheets of lasagne, remaining besciamella sauce and grated cheese. Sprinkle with bread crumbs. Place baking pan on a baking sheet and bake for 20 to 25 minutes, or until bubbling and golden brown on top.

Related post/s:
Homemade basil pesto recipe

Armenia: Lamb and Orzo

For 2012, I told myself that I would go back to writing. This week, when I returned from my Christmas-birthday and New Year trip in San Francisco, I immediately got back to cooking. It wasn’t just to eat; it was to start updating this Web site as soon as possible to keep up with that resolution.

While in San Francisco, I cooked beef stew for a family of five who was renting a house by the ocean in Montara, a few miles away from downtown and minutes away from beautiful Pacifica. I only had a couple of hours to feed all of us–we were all tired from our respective full day–so I felt like I didn’t deliver as much as I could have if I had more time or if I was cooking in my apartment back in New York City with all the necessary equipment. They ate the food though, and I honestly think they enjoyed it; or they were just really being polite!

To make up for that shortcoming that’s still eating me a little bit inside, I asked an Armenian co-worker for a tried and true winter stew recipe. He emailed me a rough draft of this lamb and orzo recipe and I put my own spin to it when I got home. While I was cooking, I remembered that back in 2006, I had started this mini-project to cook as many traditional family recipes from people I know who hail from different countries.Unfortunately, I stopped updating it in 2008, but now I have another excuse to go back to writing.

I don’t know much about Armenia. Okay, I know nothing besides what I learned from Ararat, the 2002 movie about the genocide. But even my co-worker blames his too-American father for knowing more about Chinese culture (his wife is Chinese) than his own. When he visits his family in Colorado, this dish is one to be served during their stay. They save it for special occasions–perhaps because lamb was more expensive to procure back in the day–but also because it was hearty and brought the family together.

I now wish I can get another chance to cook for that same family in Montara so I may redeem myself, impress a little bit more and bring the members back together again.

Ingredients:
1 stick of butter, cut in quarters
1 1/5 lbs of lamb stew cuts
salt
pepper
1 yellow onion, minced
beef broth
3 tomatoes, chopped
1 large green pepper, seeded, chopped
1 15-ounce can of tomato purée
2 cups of orzo pasta

1. In a large heated Dutch oven, add the butter until browned and almost melted. Add and brown the lamb pieces on all sides. Season with salt and pepper. Add the onions and mix until translucent. Cover the pot and cook for 1 hour in low heat.
2. Check after the first 25 minutes and add a splash of beef broth so that the meat doesn’t burn or stick to the pot. Gently stir with a wooden spatula. Repeat after the next 25 minutes to avoid burning. Add the tomatoes and the bell pepper after the hour is up and cook for another 30 minutes. Add another splash of broth after the first half of the 30 minutes to avoid burning the vegetables.
3. Boil some water in a separate pot and set aside. Uncover the Dutch oven and add the tomato purée to the lamb and vegetables. Slowly add some hot water splash by splash, or until you have the desired consistency. Your stew must be somewhat saucy, not too thick but not too watery either.
4. Raise the heat to medium-high. Add the orzo and cook by constantly stirring everything with your spatula, about 10 minutes or until the pasta is al dente. Feel free to add a jig or two of the hot water to make sure your sauce does not thicken too much. Season with more salt as necessary. Turn off the stove and cook the pasta for the last 2 minutes with the remaining heat by stirring some more.

Related post/s:
Cooking the World: Global Gastronomy

Homemade Pici Pasta with Tripe

I had to waste four cups of flour before I perfected this recipe. The first recipe I found online did not require eggs nor all-purpose flour, just semolina and water. I thought that was odd, but I gave it a try anyway. I should have trusted my instinct. The “dough” refused to stick together and just ended up becoming a shredded mess. I found another recipe that required eggs but did not list semolina, so I thought I’d combine the two instructions until the dough felt right in my hands, just like I learned in my gnocchi class last year.

And what exactly is “right”? I’m not sure if I can describe, but after I mixed the flour with the eggs, I freely sprinkled the kitchen counter with semolina and started kneading. Every time the dough got a little sticky, I dusted with more semolina to allow me to continue kneading it. I stopped until the dough felt pliable enough to cut and roll into snake-like noodles. That’s the word I was looking for! Pliable!

It took an hour to make the pici and they looked like they weren’t going to feed more than two people, but as soon as I cooked the pasta and distributed them to three deep serving dishes, I had enough for two more servings the next day. The cooked pasta was plump and I really needed just one tong-heaping for each person.

Caz Hildebrand’s The Geometry of Pasta is an awesome book about pasta with really cool illustrations.

Ingredients:
2 pounds of tripe, thawed, thoroughly washed, dried with paper towels
salt
vanilla
3 cloves of garlic, minced
1 red onion, chopped
1 can tomato sauce

For the pici pasta:
3 cups of all-purpose flour
3 eggs
1 to 1 1/4 cups of lukewarm water
olive oil
semolina flour
any hard cheese, shaved
some parsley, finely chopped

1. Prepare the tripe. Cut the tripe into smaller square sheets and cook in a large pot of boiling water with the salt and vanilla for about an hour, or until the tripe is tender. It’s okay that they are still a little chewy; just make sure it’s not rubbery. Drain and slice into smaller pieces.
2. Make the pasta while the tripe is cooking. Pour out the flour on a clean kitchen counter surface and create a hole in the middle. Crack each egg in the center of the well and mix with a fork. When the egg is mixed into the flour, begin to add a tiny bit of water at a time, each time trying to mix in as much flour as possible. When all of the flour is mixed in, begin to knead the flour. You’re going to probably do this for about 8-10 minutes. When complete, make dough into a mound and pour a teaspoon of olive oil on top. Cover with a dish towel and let it rest for 10 minutes.
2. Cut the dough into smaller pieces and roll each into thin dowels and into snake-like noodles. Place the pici on a sheet tray that has been dusted with semolina flour and cover the pasta with the dish towel. Set aside until ready to use.
3. Make the sauce. In a large pot, heat some oil. Sauté some garlic until light brown. Add the onions and sauté until translucent. Add the tripe and cook by sauteéing. Lower the heat and add the tomato sauce. Mix and simmer for 10 minutes, just enough to incorporate the tomatoes.
4. Cook the pasta. Salt a large pot of water and put over high heat until boiling. Add the pici and cook for 10 minutes or until al dente. Use tongs to remove them from the water onto deep serving dishes. Top with sauce, cheese and parsley.

Related post/s:
Homemade gnocchi the Rustico Cooking way
Tripe tacos in Sunset Park, Brooklyn