Where to Eat in Singapore: Golden Mile Food Centre

Okay, let’s divide and conquer. As soon as Ari said those words, I immediately knew I was with the right people to eat with at Singapore’s Golden Mile Food Centre. I had done my online research before I flew to Singapore fron New York City and noted the stalls that were must-visits and the dishes that were must-tastes for several bloggers. Without prior knowledge of the Centre’s floor plan, Golden Mile could be overwhelming. It was during lunch hour and the place buzzed; queues sometimes stretched 10-people deep, which is pretty long for a stall that could only fit one or two cooks inside. For such a minimal staff, though, they worked like efficient conveyor belts setting up bowls after bowls and distributing just the right amount of each ingredient with precision.

Past the altar with incense burning and plates of food being offered to Hungry Ghosts for the month of August, my friends saved a table as I doled out assignments: Hainanese chicken rice from Stall B135 to Ari, beef noodles from Stall 01-89 to my brother and lormee from Stall 01-100 to Thalia. I owned the fried fish with bihon from Stall 01-101. We had char siu and kway teow on the list from Stalls 01-70 and 01-91 respectively, but both stalls were closed. To make up for those dishes, we tried the Indian-Muslin sup tulang on the basement level. To wash everything down, we drank the ubiquitous Tiger beer and tried the fresh sugar cane juice.

Are you sitting down? Check out the photos below and try not to lick your screen.
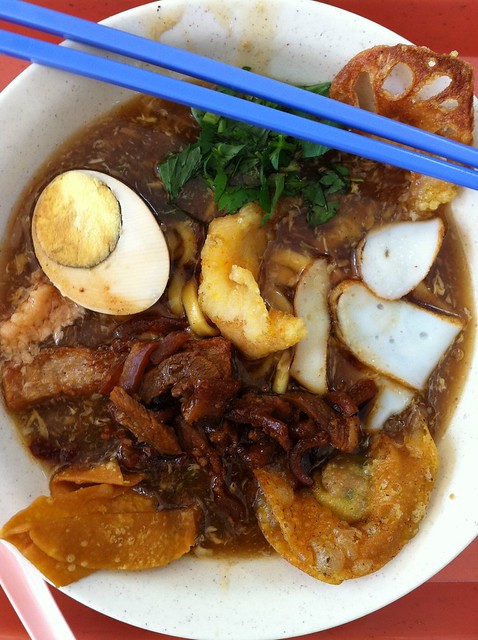
Lor mee
A complicated-looking bowl of soup that includes flat fried dumplings, fish cake and hard-boiled eggs in a thick and starchy gravy made out of cornstarch. The lor mee, or the yellow flat noodles, actually get overpowered in this dish, and to me, the sauce was much better with white rice.

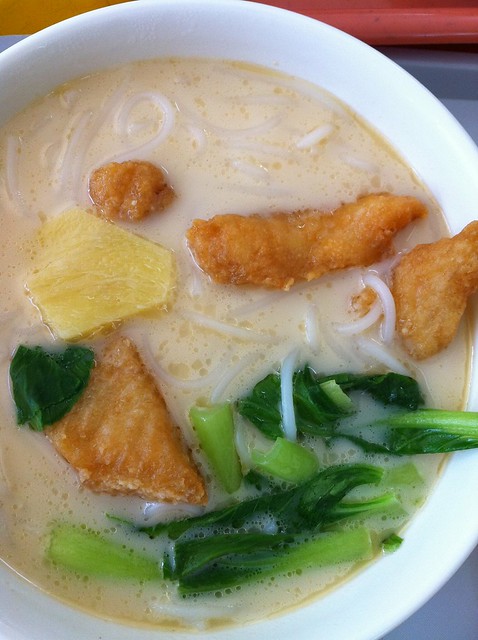
Fried Fish with Bihon
No one at our table was excited about this dish as much as I was. When I was in line waiting for my order, the lady asked me, Meer? I didn’t understand her until she pointed to the can of evaporated milk on the counter. (Throughout my stay in the country, I had problems understanding the locals’ English with Chinese and British intonations.) I asked her if she recommended milk and she poured just enough in the broth to make it cloudy. The fish pieces were airy and crisp, and the bihon, or rice stick noodles, were a good addition to the lightness of the soup.
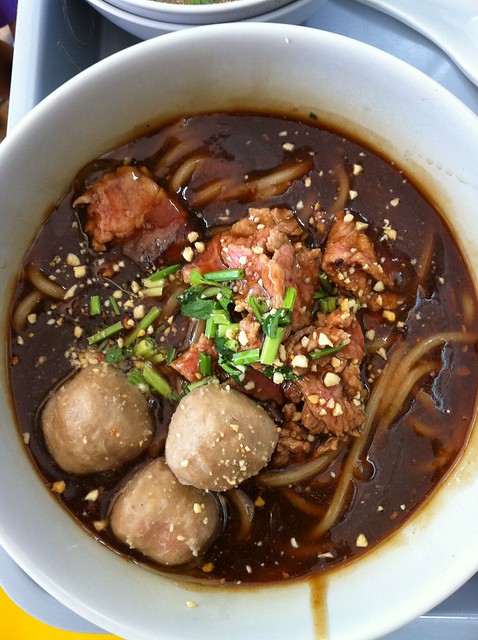
Beef Noodles
Don’t be fooled by its boring name. The soup is not as thick as the lor mee‘s, but the pieces of thinly sliced beef made this so nice and hearty. The fried fish balls with the crumbled peanuts and chives completed the look. It’s a beauty:

Hainanese Chicken Rice
If I have access to this good of a Hainanese chicken rice here in New York City, I wouldn’t mind eating it everyday, but I don’t. The Nyonya restaurant version in our Chinatown is bony, and the rice tastes and looks like chicken bouillon was involved instead of cooking the rice in a master stock. In Singapore, the rice is oily–as it should be–and the flavor has more depth.
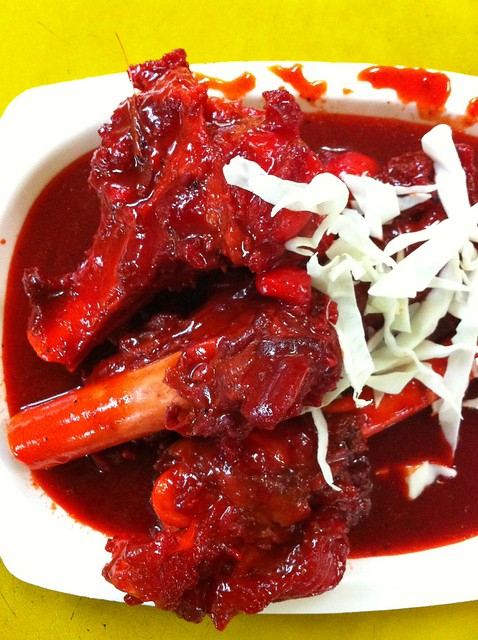
Sup Tulang
The bright red-dyed mutton bones that gained notoriety on TV after Anthony Bourdain sucked the marrow out of them using a straw. I prefer getting the marrow out by holding a bone with my left hand and then tapping my wrist with my right. But then again, I also prefer my marrow served with finely chopped red onions and parsley on a nicely toasted baguette.

The Golden Mile Food Centre is at 505 Beach Road and is open from 10am until 10 at night. You must go on an empty stomach.

Related post/s:
Golden Mile Food Centre in Singapore photos on Flickr

Braised Rabbit with Cornichons and Shallots

Seventeen miles later, I had everything I needed to replicate this recipe from Gabrielle Hamilton of Prune, one of my favorite restaurants here in New York City: one whole rabbit from Ottomanelli and a pint of cornichons from Fairway. I had woken up very late that Saturday, so after I decided that rabbit was going to be the night’s dinner, I biked to the butcher in the upper east side after a loop around Central Park to make up for my non-day. Ottomanelli’s unfortunately did not have cornichons, so I had to nervously cross town and go to Fairway where I knew a tub of cornichons is always available. I almost got doored on York Avenue and a turning cab cut me off on First that by the time I reached the west side, I was just glad to be alive. The adventure continued as my bike bag flew off its clipping on 125th Street and a guy in a Zip car had to tell me about it. Biking back to where my bag landed, a man helped me put it back on my bike rack. It was heavy and he just had to ask, What’s in there? I laughed and said, A rabbit.

Rabbit legs pre-ordered from a reputable butcher works best for this recipe, but if you can only get a whole rabbit, make sure it’s already been cleaned. The skin under the belly was a little gnarly even for me, so I sliced it off and cleaned off the innards that were kept intact. Chopping the whole rabbit into large pieces was easy with my new Santoku knife sent to me by Wusthof. Not only was it very sharp and made slicing through the rabbit’s tiny bones easy, its new blue handle is lighter yet still hefty for fast cutting. A row of beveled ovals on the edge of the blade prevented the meat from adhering to it and minimized the drag that most cleavers have; butterflying the front part of the body was so easy and so was separating the hind legs from the rest.

Ingredients:
1 whole rabbit, cleaned, thawed if previously frozen, chopped in large pieces
salt
pepper
olive oil
4 large shallots, thinly sliced
1 pint of cornichons including brining juice
1/4 cup white vinegar
3 cups chicken stock, or as needed
4 tablespoons butter, cut into pieces
a handful of parsley, finely chopped

1. Pat the rabbit pieces dry and season with salt and pepper. Heat some oil in a large Dutch oven over high heat. Brown the rabbit pieces on both sides. Transfer to a plate.
2. Reduce the heat to medium-low and add the shallots to the pot. Sauté until tender, but not browned, while gently scraping off the browned bits from the bottom of the pot.
3. In the meantime, heat oven to 350º. When onions are tender, add the cornichons, brine and vinegar and let simmer. Return the rabbit with the accumulated juices. Add enough chicken stock so that it’s within 1/2-inch of covering the meat. Bring to a boil and then turn off the heat.
4. Cover the pot and braise in the oven until the rabbit meat is tender and the leg joints bend easily, about 30 minutes. Transfer legs to a plate and keep warm. Skim cornichons and shallots from the sauce and set aside.
5. Return pot to medium-high heat, and boil until sauce is reduced by about half. Whisk in butter a piece at a time and adjust salt and pepper to taste. Return rabbit, cornichons and shallots to the pan until just reheated. Stir in parsley.

Related post/s:
Buy Gabrielle Hamilton’s book

Spaghetti with Anchovies and Arugula

Do you ever crave salty food? Last weekend, when I opted to stay in and take cat naps in between eating, all I wanted was salty food. Throughout the Two Days of Nothing, I caught up with Words with Friends games I’ve neglected, organized my music files on Spotify (well, I tried to) and endlessly snacked on leftovers and cooked small easy dishes to fulfill my meal requirements.

This pasta dish is one of those easy ones. I used spaghetti because it’s all I had in my pantry, but I think bucatini works better for its thickness. I sure hope you keep jars of anchovy fillets in your kitchen–they’re very useful for salad dressings, sandwiches and pasta dishes like this one. You can go all fancy and get the Italian brands that cost more than $10 for a small jar, or find a small can of it for less than $3 at your local grocery store. I prefer the anchovy fillets in olive oil, but the ones in water will do if you just drain them before adding to the dish.

Ingredients:
a fist of spaghetti or bucatini
salt
oil
4 cloves of garlic, minced
a small jar of anchovy fillets in olive oil
red pepper flakes
a handful of arugula
parsley

1. Bring a large pot of water to a boil with some salt.
2. While waiting for the pasta to cook al dente, heat up some oil in a deep skillet on the next burner. Sauté the garlic in medium heat and then add the anchovies. Sprinkle in some red pepper flakes. When the garlic sizzles and the anchovies break up, turn the heat down to low.
3. The pasta should be al dente at this point. Transfer the pasta to the skillet using tongs. Toss to combine the anchovy with the pasta. Drizzle in some of the pasta water to avoid drying it up. Add the arugula and the parsley and turn off the heat. Cook the greens in the remaining heat. Add salt if necessary.

Related post/s:
Make an awesome tuna sandwich with your leftover anchovy
I love the chewy anchovy side dish in New Malaysia restaurant

Lussekatt, Swedish Saffron Bread

Francine was coming over from Connecticut for brunch so I wanted to bake something that would bring back the Stockholm memories we shared together earlier this year. This traditional Christmas bread, or lussekatt, gets its yellow-orange color from saffron threads and is baked into S-shapes with raisins. They’re yeasty–a big plus to me–but also sweet (I cut down the sugar by half) and good with tea in the late afternoon. Of course, it’s the middle of summer here in New York City and Francine brought a bottle of Belvedere Bloody Mary vodka to mix drinks, but just like our Sweden trip, brunch broke all established rules.

I made other alterations to this Saveur Magazine recipe besides cutting down the sugar. I didn’t let the S-shaped dough sit for another 30 minutes while I preheated the oven. I also didn’t mix the beaten egg with a splash of water before brushing the tops with it. I’m not a baker, so I didn’t notice the difference: my saffron buns turned out pretty well. I think the Swedish gnomes would be proud.

Ingredients:
2 1/4 oz packages of active dry yeast
2 cups whole milk, heated until warm to the touch
2 tsps saffron threads
1/4 cup plus 1 tsp sugar
6 1/2 cups flour
3/4 tsp salt
3 eggs
12 tbsps unsalted butter, room temperature, and cut into 1/2-inch cubes
golden raisins

1. In the bowl of a stand mixer fitted with a paddle, mix together yeast, milk, saffron and 1 tsp of sugar. Let sit until foamy, about 10 minutes. Stir in remaining sugar, flour, salt and 2 eggs. Mix on low until dough forms and gathers around the paddle.
2. Replace the paddle attachment with the dough hook and add butter. Knead on medium-high speed until dough pulls away from the sides of the bowl, 8 minutes.
3. Grease a large glass bowl with butter. Transfer dough to the greased bowl and cover with Saran wrap. Let sit in a warm place until it doubles in size, about 1 hour.
4. Divide dough into small pieces and roll each piece into a medium-length rope. Form each rope into an S-shape and then roll each end into a tight spiral. Place buns 2 inches apart on two baking sheets lined with parchment paper. Place raisins at the center of each spiral.
5. Preheat oven to 400º while lightly beating the remaining egg. Brush each bun with beaten egg. Bake until buns are golden brown and cooked through, 15 minutes.

Related post/s:
Our travel story in Stockholm, Sweden
Wow, a 2005 recipe for Swedish meatballs

Shiso Leaf Buns

A few weeks ago, I decided that the only way I would bake more is if my heavy KitchenAid mixer is actually taking up real estate on top of the kitchen counter. That way, it can stare and taunt me: Bake, bake, bake! I realized that whenever I have the urge to bake, I fall into the lazy hole after I open the cabinet door that keeps the mixer: I have to carry that big thing out of there? Never mind. But I’ve baked twice in the last couple of weeks and so far I’m amazed at how easy it is to knead the dough and transfer it into a bowl to let it rise. The cleanup of all the mixer parts was what always made me stay away from baking–not so anymore.

A few months ago, I planted several shiso leaf seeds I bought from the Kitazawa Seed Company. I knew they would grow easily and I imagined a lot of sashimi wraps during the summer months. I now have more shiso than I need, so when I found a photo of scallion-cilantro buns from a magazine, I thought I would adapt the recipe since they’re not as spicy as what you usually eat in Japanese restaurants. Perhaps it was the growing condition in my garden–the humidity and summer thunderstorms have changed the way my shiso leaves taste. The one improvement I would make if I bake these buns again is to add a sprinkling of rock salt on top of each.

You can get fresh shiso leaves from your favorite Japanese grocery store, but perilla or sesame leaves are great substitutes and would be less pricey and tangy.

Ingredients:
2 tsps active dry yeast
2 tsps salt, divided
2 tsps sugar, divided
1 3/4 cups plus 3 tbsps all-purpose flour
4 tbsps unsalted butter, chilled, cubed
1 large egg, plus 1 yolk
2 cups shiso leaves, julienned, then finely chopped
1/2 cup sesame seeds
1 tbsp black sesame seeds
olive oil

1. Line a baking sheet with parchment paper. Sprinkle yeast, 1 tsp salt and 1 tsp sugar in a small bowl with warm tap water. Let stand until mixture bubbles, about 10 minutes.
2. Place flour, butter, remaining 1 tsp salt and remaining 1 tsp sugar in bowl of a stand mixer with dough hook attached. Rub in butter with fingertips until mixture resembles coarse meal. Beat in egg, extra yolk and the yeast mixture, scraping down sides.
3. Knead on medium speed until dough is soft and smooth, about 5 minutes. Form dough into a ball; transfer to a large, lightly oiled bowl. Cover and let rise until doubled in size, about 1 hour.
4. When ready to bake, preheat oven to 350º. Mix shiso with the sesame seeds in a small bowl. Using a rolling pin, roll dough into a rectangle. Spoon shiso mixture evenly onto center and spread mixture to corners of dough. Working from one short edge, roll dough rectangle into a cylinder.
5. Cut cylinder into 3/4″ dough swirls. Transfer dough swirls to prepared baking sheet; brush with oil. Bake until golden brown, no more than 30 minutes.

Related post/s:
Making your own maki rolls
Shiso oil recipe