• The ginger-garlic paste I made three weeks ago is proving to be very useful. I first made it for dilled vegetables when I started cooking for some of my co-workers. I have since used the batch I stored in the freezer for two kinds of kimchi and now for this dish. It’s so much easier than peeling and chopping garlic and ginger all the time. And because they’ve been puréed together, the paste is much more fragrant. I love snapping a frozen sheet of it and just waiting for a few minutes before throwing it in a pot of vegetables.

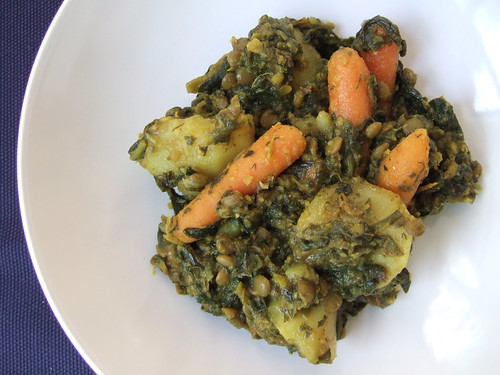
    This is the first time I’ve cooked with black-eyed peas. I’m only familiar with it from Cameron’s traditional New Year’s dish. She made it for our group when we welcomed 2007 in Florida and again in Austin last January. This take is more northern than southern; in fact it’s a northern Indian specialty in Punjab, Kashmir, Uttar Pradesh and Delhi according to Monisha Bharadwaj’s India’s Vegetarian Cooking.

    Ingredients:
    3 cups of black-eyed peas, soaked in water overnight then drained
    1 onion, finely chopped
    2 tomatoes, chopped
    1 tbsp ginger-garlic paste
    a handful of cilantro, finely chopped
    1 tsp cumin seeds
    1 tsp chili powder
    1 tsp turmeric
    1 tsp garam masala
    1/2 tsp sugar
    oil, salt

    1. Heat some oil in a large Dutch oven. Toast the cumin seeds until fragrant. Stir in ginger-garlic paste and cook for 1 minute.
    2. Add the black-eyed peas and sprinkle in the chili powder, turmeric and garam masala. Cook for another minute. Add the tomatoes and sugar and season with salt. Mix and add 3/4 cup of water, cover and bring to a boil.
    3. Reduce the heat and simmer until the peas are tender. Mash some of them to add thickness to the sauce. Turn off the heat and mix in cilantro before serving.

    Related post/s:
    Part of my Mother Hen project: omakase bento #4
    Make your own ginger-garlic paste and store in freezer
    I also make my own garam masala spice

  • Southern cuisine’s “dirty rice” gets its name from the offal pieces they add in their rice. Comfort food often contains more than its fair share of fried stuff as well as heavy starches and some people say “dirty” is also taken from that. I honestly fucked this dish up so I had to literally scramble and rename it “dirty”. I stir-fried the Brussels sprouts and carrots with the salted black beans and then browned the tofu. When it was time to turn the tofu over, they just fell apart. Fuck it, I thought, and I just mixed everything together.

    Mark Bittman recently featured canned black beans and I immediately recognized them as the 89-cent cans I see in Chinatown. Filipinos call them tao-si because the black beans come from long string beans we call sitaw. Reverse that and you get taw-si. The spelling changed to make it sound more Chinese. Oh, those Filipinos! I knew they were salty–the beans, not the Filipinos–but not that salty, so I added rice to the dish to fix it up. Sometimes, the most wonderful dishes come out of mistakes made in the kitchen.

    Ingredients:
    2 small buckets of Brussels sprouts, hard tips sliced off, quartered
    a handful of baby carrots, julienned
    1 package of extra firm tofu, sliced into strips
    1 can of salted black beans, drained
    2 cups of steamed white rice
    juice from 1 lemon
    1 onion, finely chopped
    oil

    1. In a large skillet, heat some oil. Sauté onions until translucent. Add black beans and cook for 1 minute. Add Brussels sprouts and carrots and stir-fry until carrots are tender. Set vegetables to the side and make room to fry the tofu.
    2. Add some more oil if necessary. Brown the tofu on one side. When turning tofu over to cook the other side, they may stick. That’s okay. You can mix them up with the vegetables and make a scramble. Add rice and continue to mix until fully combined. Add lemon juice to control the saltiness of the black beans.

    Related post/s:
    Part of my Mother Hen project: omakase bento #4
    Stuff tomatoes with rice this summer

  • Twenty-four hours before, we were in Philadelphia, the so-called sixth borough of New York City. It was like summer and everyone was out walking and enjoying the weather. From the Reading Terminal Market, we picked up some purple potatoes and apples, a bunch of arugula and escarole. We planned to cook a nice fish dinner back in New York City with the fresh produce we stuffed in my canvas bag. Alas, there were no more whole fish at Eli’s grocery store when we stopped by in the upper east side so we moved to Plan B. We bought two pork chops from the back and I thought of baking them with the Fujis. The Dr. was exhausted and just wanted to leave the cooking to me. I’ve done a similar dish before using red and white wines, but we were starving and this had to be fairly easy and quick. We snacked on the beef jerky we bought from Philly and drank the Hungarian red brought by co-workers from Budapest while we caught up with New York City news.

    Ingredients:
    2 pork chops
    1 Fuji apple, peeled, sliced
    1 onion, finely chopped
    5 small purple potatoes, halved
    1 cup veal stock
    2 tbsp mustard
    1 tbsp brown sugar
    2 cloves
    salt, pepper, oil

    1. Preheat oven to 375º. Sprinkle pork chops with salt and pepper.
    2. In a large skillet, heat some oil and brown the pork chops on both sides. Remove to a plate. Using the same skillet, sauté onions while scraping the bottom of the pan to include the pork bits. Remove to another plate.
    3. In a small bowl, combine stock with mustard, sugar and cloves. Whisk and season with some salt and pepper.
    4. Transfer pork chops to a baking dish. Add potatoes around them. Top with caramelized onions and pour in flavored stock. Bake in the oven for 45 minutes, turning chops over during the last 15 minutes of cooking. Remove the chops to a chopping board and let rest while the potatoes roast for another 15 minutes.

    Related post/s:
    My first pork chops with apples included white and red wines
    Craving pork chops after Ramadan in Tunisia
    Pork chops with summer cherries

  • 402 West 43rd Street off Ninth Avenue
    212/564-7272
    about $190 for two, with drinks, with tip
    ♥ ♥

    I remember my first time in Esca as if it happened just last week. The $700 bill was split in four, my purse let out a small cry and I hoped that the next time my friends from Ireland visit, I would be able to afford dinner without wincing at the price. Several checks from other restaurants have since surpassed that moment so I knew it was time to go back to Esca. I was with the Dr. and I was armed with a more sophisticated palate for Italian cuisine and seafood.

    So why did I think everything we ate was too salty?

    We were tempted by the crudo tasting. For $30 each, we could have had six appetizers served in two flights but we wanted to save our appetites for the beautifully described pasta dishes. We started with half a dozen of the oysters and the geo duck ceviche. I’ve never had geo duck but I’ve always wanted to buy it from Chinatown just for laughs. The texture reminded me of abalone–tender and a little tough, but wait…I’ve had better ceviche than this before. Where was the chili and lime essence? My tongue was desperate for that spike. The oysters from Oregon were perfectly briny and all I wanted from the ceviche was more ocean taste to compliment and prepare me for the rest of our meal.

    We had a very rich pasta course coming up so we decided to order two vegetable plates. The white asparagus was breaded and slathered with a thick sauce. I destroyed the brown crust–I wanted more asparagus than a fried casing. The insalata di porcini would have been my kind of salad if only it wasn’t overwhelmed with the cheese. I loved the beefiness of the porcini mushrooms and I was all over the mache, or lamb’s lettuce. I didn’t think the dish needed anything else; the cheese got in the way of the salad’s simplicity.

    We were getting disheartened and knew that we only had one more dish to lift our spirits. The guitar spaghetti with sea urchin and crabmeat was to rescue the night! Alas, what we hoped for was a more Japanese treatment of the uni–bright and yet subtle–but what we got was an overpowering taste of cream and salt. I wish they left the uni alone to do its job with the crabmeat. It was supposed to be a rich and graceful dish, not loud and overbearing.

    After two rhubarb bellinis and a panna cotta, we finished our meal and stepped out into the pouring rain. On our way home in the cab, we both wished Esca turned everything down a notch just like the faint tartiness in my drink and the delicate sweetness of my dessert.

    Related post/s:
    Esca, back in the days
    Ireland will always have a special place in my heart

  • I was tempted to omit “or baby goat meat” in the recipe title because grilled kid sounded funnier. This recipe is from Scott Gold’s The Shameless Carnivore, a new book about, well, eating all kinds of meat. It’s obvious from the title alone why I felt an affinity towards the book. His recipe called for cubed goat meat for barbecue and kebabs, but when I went to the farmers’ market, Patches of Star Farm from Nazareth had already ran out. The lady sold me rib chops instead.

    I’ve had goat meat before but never this tender. It makes a huge difference when the animal is a young one. The younger it is, the more tender the meat. The chops weren’t any bigger than my hand so they took less than 10 minutes to cook both sides. I served two chops to myself with a side of kimchi and some rice.

    Ingredients:
    1 pound fresh baby goat rib chops
    juice of 2 limes
    half a bunch of cilantro, finely chopped
    1 tsp ground cumin
    1 tsp chili powder
    oil, salt

    1. Combine all ingredients except goat in a bowl and whisk. Season with salt to taste.
    2. Transfer the marinade in a shallow glass baking pan with cover. Add the goat, making sure all the meat is covered by the marinade. Cover and refrigerate overnight.
    3. When ready to cook, heat a skillet. When almost smoking, add one or two goat rib chops at a time. Apply light pressure on the meat using a cast iron grill press or the back of a large spoon. Cook for 3 to 4 minutes per side.

    Related post/s:
    Buy Scott Gold’s The Shameless Carnivore
    I bought a pound of goat rib chops from Patches of Star Farm from Nazareth, Pennsylvania

  • These came out looking more like mini-sausages than authentic gnocchi. I’m sure any Italian grandmother will freak out if they saw how I made these at home. It seems like a lot of work but after you mash the potatoes, they kind of form themselves with just the help of some extra flour. It’s helpful to have a Bravo TV marathon on in the background.

    If making ahead of time, prepare them on a baking sheet and put in the freezer for about 15 minutes. Then transfer them to a Ziploc bag and keep in the freezer until ready to boil. Do not thaw them out; just throw them in a pot of boiling water when ready to serve.

    Ingredients:
    6 medium-sized Yukon gold potatoes, washed
    2 bunches of spinach, thoroughly washed, chopped
    1 cup flour, and more for dusting
    1 egg
    oil, salt, pepper

    1. Cook potatoes in a large stock pot with boiling water, about 25 minutes. Remove from water and let cool. When cool enough to handle, peel by gently shredding the skin off with a fork. In a large bowl, mash potatoes. Add flour and egg to the mashed potatoes and combine well. Season with salt and pepper.
    2. On a clean table surface dusted with flour, form medium-sized logs using hands. Keep sprinkling flour as necessary to avoid potatoes from sticking to hands. Slice off small quantity of dough and form mini-sausage-shaped “dumplings”.
    3. In a large pot of boiling salted water, add the gnocchi and remove to a paper towel-lined plate using a slotted spoon when they float on top.
    4. Heat some oil in a skillet. Fry the gnocchi until light brown on all sides. Remove to a serving plate and top with pesto.

    Related post/s:
    Part of my Mother Hen project: omakase bento #3
    Make your own pesto

  • You can find smoked tofu from your Chinatown’s refrigerated aisle next to the regular tofu. I order a spicier version of this salad whenever I’m in a Sichuan restaurant because I like the combination of spongy and crunchy textures. The tofu brings down the spiciness of the other dishes while the celery cleanses the palate. With a dash of red pepper flakes, this salad makes a good starter for non-Chinese dishes.

    Ingredients:
    1 package smoked tofu, sliced thinly
    5 stalks of celery, cut into matchsticks
    a splash of soy sauce
    a splash of rice wine vinegar
    red pepper flakes
    peanut oil
    salt

    1. Heat peanut oil in a large skillet. Add the celery and stir-fry for 4 minutes. Add the tofu and continue to stir-fry for another 4.
    2. Add a splash of soy sauce and rice wine vinegar. Sprinkle some salt and red pepper flakes. Toss and cook for the last 2 minutes.

    Related post/s:
    Try the Spicy & Tasty way in Flushing, Queens
    But the Grand Sichuan on St. Marks is closer

  • 65 Fourth Avenue between 9th and 10th Streets
    212/388.0088
    about $40 for two, with drinks, with tip
    ♥ ♥

    Shigemi Kawahara became Japan’s Ramen King after winning three consecutive years in a TV program against other ramen chefs. After twenty years in business, people still line up outside his Ippudo branches in Japan. This East Village store is his first foray overseas. The pandemonium has now reached New York City and the wait for a table to eat ramen is already two hours long. Alas, Ippudo’s reputation precedes itself.

    We put our names down around 7pm and bought a few drinks around the East Village before heading back to see if the maitre d’ was any closer to calling out our names from her book. Two more Sapporo and Kirin drafts later and we were finally seated in front of the beautiful sequin piece in the back (next to chef Pichet Ong, no less). I immediately noticed the heavy wood interior when we walked in. Everything inside Ippudo looks expensive. I realized I’ve seen this kind of design before (Wagamama in London and Momofuku a few blocks away), but Ippudo presents itself quietly and with grace. Don’t expect loud music inside; there’s a buzz but it doesn’t get as loud as David Chang’s Noodle Bar. During opening week, they seemed understaffed because service was slow. The waiters were attentive but I just didn’t want to wait for my food any longer after having already waited two hours.

    It’s amazing how a simple food item like ramen can be glorified this way. There is no need to bill the Berkshire pork nor the organic ingredients. At Ippudo, it’s all about the art involved in making the ramen. The high-quality ingredients just follow.

    We ordered the bowls Ippudo is well known for: Akamaru Shin-aji and Shiromaru Moto-aji. The akamaru was appropriately served in a red bowl (aka is “red” in Japanese) while the shiromaru was in a white bowl. (Shiro translates to “white”.) The broth is milky white, a sign that pork bones have been simmered for a few hours, but it didn’t have that slimy smell you usually get in regular ramen broths. It tasted of pork, but clean and rich at the same time. You don’t begin to really appreciate the Ippudo signature until you start chewing on the noodles. Firm and tender noodles. I never had ramen noodles like this before even from the small ramenyas in Tokyo.

    They ran out of the kakumi, or pork belly with braised daikon radish, when we visited so we supplemented our ramen bowls with the Ippudo roll instead: grilled pork with custard and cucumber. We slurped loudly and happily, appreciating every effort that has gone to making each noodle the way ramen should be.

    Watch out Momofuku.

    Related post/s:
    Village Yokocho a few streets down has a shorter wait, plus Angel Share makes good drinks
    Pichet Ong of P*Ong sat next to us

  • You can use almost any vegetable to make this dish at home. I chose potatoes and carrots because they are hefty enough to keep me full for a couple of hours. The spinach, I think, is a must–don’t be afraid to use frozen spinach leaves if you want to skip the chore of washing them. Add some roasted butternut squash and you’ll be more than set for autumn.

    I made my own ginger-garlic paste and froze them in batches. Store leftovers by spreading a small bit on Saran wrap. Top it with another sheet of Saran. Repeat until you have a small stack of ginger-garlic paste separated by Saran in sheets. Store in a resealable plastic bag and put in the freezer. If you want to skip that step, just add 2 tbsp of ginger cut in thin strips and 3 cloves of minced garlic.

    Ingredients:
    3 bunches of spinach, rinsed thoroughly, chopped
    3 potatoes, peeled, quartered
    half a bag of baby carrots
    2 tomatoes, chopped
    1 1/2 cup of lentils, washed and drained
    a handful of dill leaves, chopped
    1 tsp turmeric
    1 tsp chili powder
    1 tsp cumin seeds
    salt, oil

    For ginger-garlic paste:
    cloves from 3 heads of garlic, peeled
    1 large ginger root, peeled, chopped

    1. Make ginger-garlic paste. Blend ginger and garlic together until smooth. Set aside.
    2. Cook lentils. In a small saucepan, boil some water and add lentils. Cook for about 15 minutes, or until lentils are tender. Remove from pan using a slotted spoon, reserving some of the water for later.
    3. In a large Dutch oven, heat some oil. Add the cumin seeds and toast until light brown. Then add a tsp of ginger-garlic paste and mix.
    4. Add all the vegetables and the lentils. Season with salt. Add turmeric and mix. Put 2/3 cup of the lentil water, cover, and cook in low fire for about 35 minutes. Stir occasionally until carrots are tender. Some of the vegetables will be mushy.

    Related post/s:
    Eat more greens and try broccoli
    Part of my Mother Hen project: omakase bento #1

  • I don’t like broccoli but these sure were tasty, was one of the comments I received after including this in my first Mother Hen project for some of my co-workers. They were my favorite, too, because they came out bright green and perfectly tender. If you need to eat more greens, this is a good dish to start with.

    Ingredients:
    3 bunches of broccoli, separated and cut into small florets
    1/2 tsp cumin
    1/2 tsp black mustard seeds
    1/2 tsp turmeric
    3 cloves of garlic, minced
    salt, oil

    1. In a large skillet, heat some oil. Add the mustard seeds. When they begin to pop, add the cumin and toast until light brown. Then add and sauté garlic. Add turmeric and mix.
    2. Add the broccoli and season with salt. Add 2/3 cup of water and cook covered for about 5 minutes. Uncover and check if florets are tender. They should still be a bit crisp. Remove from heat and transfer to a serving plate using a slotted spoon.

    Related post/s:
    I served this with sweet potatoes
    Part of my Mother Hen project: omakase bento #1

  • I started what I call Mother Hen Project at work where I cook Monday lunch for up to five people for $5 a pop. I call them omakase bento so that I don’t have to promise a menu ahead of time. They’re stored in these neat lunch boxes I picked up from a Chinatown stationary store. I have plans to have a life, so I decided to do it only once a week. The demand’s pretty good right now and I only have a few slots until the end of May to fill up. I hope they all like what they get.

    This sweet potato with maple syrup glaze recipe is matched with dilled vegetables with lentils, a seared Swai fillet and broccoli with cumin and mustard seeds. It’s a tad sweet to clear the palate off the Indian spices.

    Ingredients:
    3 sweet potatoes, rinsed, ends trimmed, peeled, cut into 3/4-inch rounds
    1/4 cup maple syrup
    a small knob of butter
    a pinch of thyme leaves
    salt, pepper, oil

    1. Toss potatoes with oil in large bowl; season liberally with salt and pepper. Line a baking sheet with aluminum foil and brush foil with some more oil. Arrange potatoes in single layer on baking sheet and cover tightly with aluminum foil. Adjust oven rack to lower-middle position, place potatoes in oven, and heat oven to 300º. Cook potatoes for 20 minutes. Carefully remove foil and continue to roast potatoes until they begin to soften slightly, 25 minutes longer.
    2. In the meantime, make maple syrup glaze. Heat maple syrup, butter and thyme in small saucepan over medium-low heat until butter is melted. Remove from heat and set aside.
    3. Remove sheet from oven and increase oven temperature to 400º. Once oven reaches 400º, return potatoes to oven and cook until bottom edges of potatoes are golden brown, 12 minutes. Remove pan from oven and brush tops of potatoes with half of glaze. If glaze becomes too stiff to brush onto potatoes, reheat it briefly.
    4. Return sheet to oven and cook until bottoms of potatoes are golden brown and glaze begins to darken, 8 minutes. Remove sheet from oven and, using thin metal spatula, flip slices over. Brush second side of potatoes with remaining glaze. Continue to roast until bottom edges of potatoes are golden brown, another 8 minutes. Let potatoes cool for 5 to 10 minutes, transfer to platter, and serve.

    Related post/s:
    Part of my Mother Hen project: omakase bento #1

  • They key to this dish wasn’t as much as the garlic as it was the shrimp flavor from the head and the shells. I spent some time shelling and deveining a pound of shrimps, and my arm hurt from pressing them to get the juice out, but all the work was worth it. I used rigatoni pasta but they turned out to be too big for the small pieces of shrimps. When you try this, use penne instead. You can also substitute the vermouth with white wine. I just didn’t want to waste a perfectly good and pricey Chateauneuf-du-Pape white–we needed another bottle of it after this very garlicky and very shrimpy pasta was done.

    Ingredients:
    1 pound large shrimps, peeled, deveined, tails removed, cut into 3 pieces; heads, tails and shells reserved
    1 medium-sized head of garlic, peeled, smashed, sliced
    1 box of penne, cooked al dente, saving some of the pasta water
    1 can of clam juice
    1/2 cup dry vermouth
    2 tsps flour
    half a bunch of parsley, finely chopped
    a small knob of butter
    lemon wedges, plus some of its juice
    1/2 tsp red pepper flakes
    oil, salt

    1. Marinate shrimps. In a large glass bowl, combine shrimp meat and a third of the garlic with some olive oil and a dash of salt. Set aside while you do steps 2 and 3.
    2. In a large skillet, heat some oil. Add another third of the garlic with the shrimp heads, tails and shells. Cook and toss until garlic is light brown, about 8 minutes. Add clam juice and vermouth and let it simmer. Using the back of a large spoon, smash the heads so that the fat comes out.
    3. When half of the liquid has evaporated, turn off the heat and remove the garlic and shells using a slotted spoon and transfer to a mortar and pestle in batches. Save the liquid from the skillet and transfer to another large bowl. Continue to get the remaining juice out of the heads and shells by pounding them with the pestle and transferring the juice back to the bowl. Discard shells when done.
    4. Turn the heat back on and add a little oil. Sauté the remaining garlic. Add the shrimp-flavored liquid and let it simmer until somewhat reduced. Then add the marinated shrimp and toss for about 2 minutes. Drop in the butter, flour and red pepper flakes and mix until butter is melted. Add salt and lemon juice to taste. Add pasta. If it gets too thick, add a drop or two of the pasta water. Turn off the heat and mix in the parsley.

    Related post/s:
    The best Chateauneuf-du-Pape bottles to buy
    If not shrimps, how about octopus with your pasta?