Longganisa, Filipino Breakfast Sausages

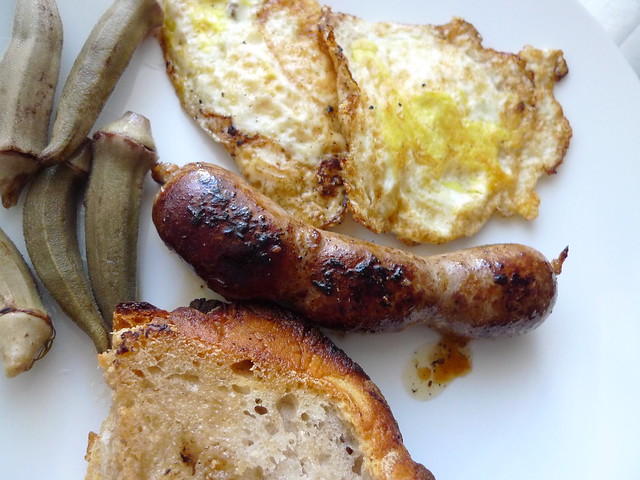
Filipinos like their meat, but we especially love our pork. We love it so much that we will eat it three times a day–for breakfast, lunch and dinner. To start a traditional Filipino day, longganisa (also longaniza), or Filipino sausage, is one of the meat choices that pair up with eggs and fried rice. All three in one dish combined make longsilog: longganisa for “long”; sinangag, or fried rice, for “si”; itlog, or egg, for the “log”. All over the Philippines, you will encounter different combinations of -silogs.

I usually dash out of the apartment during the week and eat a simple breakfast of yogurt with fruit or Three Sisters cereal when I get to work, but on weekends I splurge on time and make myself a huge breakfast especially if I’m coming from a morning bike ride around Central Park. That breakfast always includes eggs and some type of meat, be it bacon or leftover steak from the night before. I rarely have cooked rice at home (it’s a lot to waste when you’re living on your own), so my fallback is usually a salad or a type of vegetable, even if it’s a pickle. Down the list of breakfast meats after bacon that I like comes longganisa because it has a touch of sweetness and tastes so damn good with a dash of vinegar. My mouth is watering just thinking of sticky-sweet longganisa and runny fried eggs on top of hot fried rice.

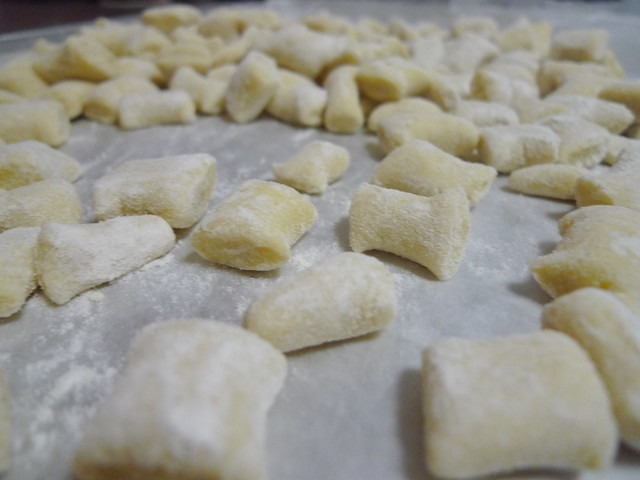
I promised myself that before the year ends, I will make my own sausages and use the attachments that I bought for my KitchenAid stand mixer. So during the long Thanksgiving weekend, I stayed busy in the kitchen and finally made them. I had asked my mother for a recipe because she’s originally from the province of Pampanga where longganisa is famous. She showed me an old copy of a Filipino recipe that used phosphate and food coloring! Fail! I then turned to my copy of Memories of Filipino Kitchens and substituted the rice wine and the rice vinegar for plain white vinegar and added brown sugar for the sweetness that I crave in these sausages. Their recipe also used lime zest which I thought was pretty interesting even though it got lost in the mix, so I have eliminated it from this version.

I learned a few important things when I made my own sausage links for the first time:
1. Making sausages is hard work, so another pair of hands is always helpful.
2. Keep lemon handy. The smell of meat will stay on your fingers for several hours and I found only lemon juice removed the odor.
3. White bread was invented to clean off your food grinder and sausage stuffer attachments.

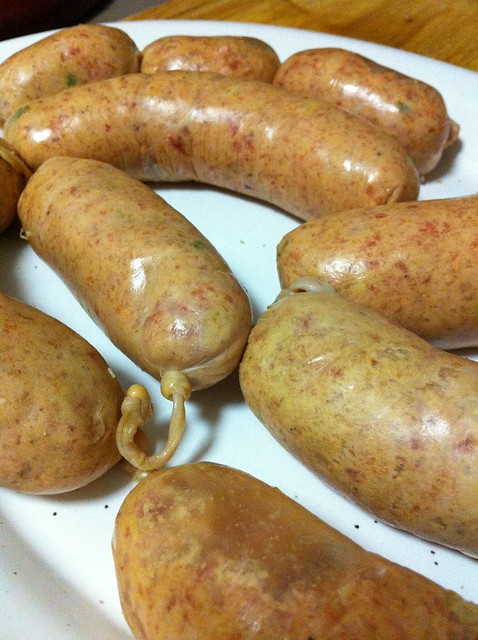
This is a two-type recipe for longganisa. One is the easy way without any equipment or casings which makes the sausages naked, or hubad in Tagalog. The other is for sausage links which requires both the food grinder and sausage stuffer attachments with your KitchenAid stand mixer, plus sausage casings from your well-stocked butcher shop.

Ingredients:
2 tbsps vinegar
2 tbsps brown sugar
3 cloves garlic, minced
salt
pepper
oil

If making them naked:
1 pound pork belly, grounded
1/2 pound lean beef, grounded

1. Add all ingredients together in a large mixing bowl and mix with your hands. Knead the meat until it holds together and you can shape the mixture into patties. Wrap in wax paper to store in the fridge or keep in the freezer.
2. To fry longganisa patties, heat some oil in a deep skillet. Add longganisa and fry using low-medium fire until both sides are browned. Crumble and break into pieces and serve with two eggs, preferably over easy.

If making links:
1 pound pork belly, cut into 1-inch chunks
1/2 pound lean beef, cut into 1-inch chunks
sausage casings, soaked overnight in cold water, rinsed
white bread slices

1. Combine all the meats with the spices except the oil. Massage with your hands to mix well. Marinate for at least an hour or overnight in the fridge.
2. When ready to make links, assemble the food grinder and sausage stuffer attachments with your mixer. Select a length of casing and run water from the tap through it in order to clear out any excess salt and spot any holes. Trim to remove the holes. Run the casing between your fingers to remove excess water. Stretch the open end of the casing around the attachment’s nozzle and gradually slide the rest of the casing onto the nozzle, an inch or 2 at a time, trying not to twist. Leave about 3 inches at the knotted end dangling free. This will be your end knot.
3. Ground the meat and stuff the casing. Put the meat mixture in the hopper of the grinder and turn it on to speed 4. Hold the dangling casing with one hand, and with the other, feed the meat into the hopper with the plastic or wooden pestle at an even pace. Your stuffer will slowly stuff the ground meat into the casing. Gently guide the rest of the casing off the nozzle to aid the stuffing of the sausage. When you have 2 inches left at the other end, stop stuffing and remove the free casing from the nozzle. This is your other end knot. Repeat this process until all of the sausage meat has been used, pushing out the last bits of meat with a slice or two of bread. Discard grounded bread.
4. Run your fingers over the casing to distribute the sausage evenly. Pinch every 3 inches or in empty spots and gently twist it to form separate links. Feel free to tie end knots.
5. To fry longganisa links, heat some oil in a deep skillet. Add longganisa and fry using low-medium fire until all sides are browned. Gently pierce empty casing that bubbles up to avoid bursts of sausages! Serve with two eggs, preferably over easy.

I realize that this is probably the longest recipe I have on this site, so I hope these photos will guide you to making your own sausages at home.

1. Stretch the open end of the casing around the attachment’s nozzle and gradually slide the rest of the casing onto the nozzle, an inch or 2 at a time, trying not to twist. Leave about 3 inches at the knotted end dangling free.

2. Hold the dangling casing with one hand, and with the other, feed the meat into the hopper with the plastic or wooden pestle at an even pace. Another pair of hands is always helpful.

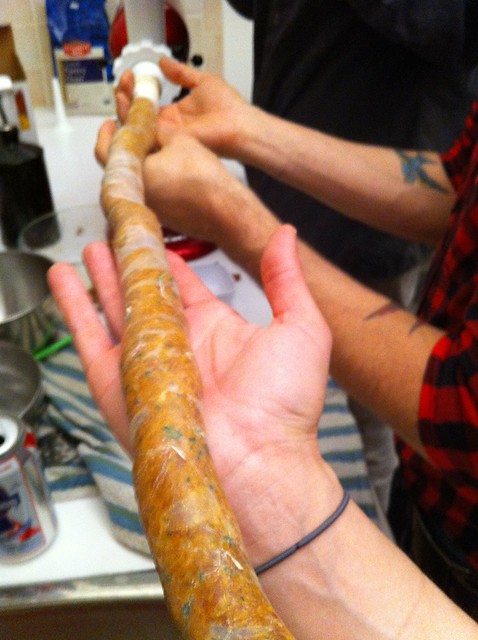
3. Your stuffer will slowly stuff the ground meat into the casing. Gently guide the rest of the casing off the nozzle to aid the stuffing of the sausage.

Please excuse the innuendos from the video above (which may not show up on your phones); they made sausage-making more fun though.

Related post/s:
You can buy sausage casings from Esposito Pork Shop in New York City
Amazon.com also sells sausage casings
These will be perfect holiday gifts: KitchenAid food grinder attachment and sausage stuffer

Kin Shop

469 Sixth Avenue between 11th and 12th Streets
212/675.4295
$100 for two with tip, with one cocktail
wheelchair patron may wheel in, but bathrooms are downstairs
♥ ♥

The last time I was on Sixth Avenue above 8th Street, I was at Jefferson Market buying blood sausages after a stranger tipped me about the store at Whole Foods. He saw how frustrated i was when I had to explain to the guy what blood sausages were. At Jefferson, sure enough, I found what I was looking for and noted that they also carried sweetbreads. (That’s another story.)

To me, Sixth Avenue between 8th and 14th is pretty much the dead part of the West Village; there’s nothing past the nice Filipino guys behind the counter at Gray’s Papaya unless you’re buying Co.Bigelow handwash or your morcilla for Sunday breakfast. I think Harold Dieterle’s Kin Shop will change that.

I was excited to eat at the Top Chef’s second restaurant in the city because of my experience at his first, Perilla. I had a very good meal there because of the straightforward cooking and I wanted to see what he could do with one of my favorite cuisines, a type that New York city overflows with but doesn’t excel at. (I’m sorry, but techno music and fake modern furniture do not make a good Thai restaurant–I’m looking at you Sea and all of you at Hell’s Kitchen.)

Jennifer and I followed our server’s suggestion that we share a few dishes family-style. We usually share plates anyway but I like that this was how it should be at Kin. We started with the pork and oyster salad, a beautiful mix of textures. The pork was crispy while the fried oyster gave softly inside the breading. The celery was crisp and added a fresh contrast. I’ve never been to Thailand, sadly, but to me this dish represents the flavor profile I truly love about southeast Asian food: mint, lime and chiles.

The soup with pork meatballs and bok choy was hard to resist. The broth had legs but was subtle, and the meatballs well-seasoned and bursted with flavor–just what I needed to warm up even more after the ALN cocktail with Thai pickle brine.

We were warned that the duck laab salad was really spicy, but we still ordered it. I believe there were preserved Chinese long beans in there, one of my favorite Sichuan pickles to make at home. Toasted rice added to the crunch while the Romaine lettuce mimicked Korean and Vietnamese dishes. They’re not kidding when they tell you some of their dishes are hot. The Thai chiles kicked in right on the tip of our tongues which made us take advantage of the buttery roti and fragrant Jasmine rice. It woke our senses up and also filled us up that we didn’t have room to try the crab noodles that came next. The next night though, I peeled the plastic cover back and ate it for dinner with a squeeze of fresh lemon juice to keep the saltiness at bay that seemed to have settled overnight. This reminded me of the Filipino pancit, only with hardly any vegetables and more seafood flavor.

The service was unobtrusive though we had to wait for a while to get our check. Our server acknowledged that she forgot to offer us the desserts, but we didn’t mind: we wheeled ourselves out of the restaurant.

Related post/s:
Harold Dieterle’s first effort was pretty good
Wondee Siam I has really excellent Thai food

Gnocchi with Sage Cream Sauce

After the sixth egg, I just knew I had to finally get a real Italian to teach me how to knead pasta dough properly. I had wasted enough flour and eggs trying to make my own while following written instructions and videos online. For one reason or another, I just couldn’t get the dough to roll into one; it kept breaking into shard-like pieces. I had no idea how it should feel under the bottom of my palms and had no basis of comparison since I’ve never made my own pasta before.

I’ve been trying to get in the recreational pasta class at the Institute of Culinary Education, but every time I checked their calendar, the class would be full. They never sent out any emails to announce when new classes opened up so I couldn’t even try to sign up earlier. Another search for pasta-making classes in New York City revealed Rustico Cooking in the midtown area. I signed up and spent half an afternoon in an open-loft kitchen with a few couples and, thankfully, some who came on their own. It turned out to be a very productive afternoon and a great–and more affordable–alternative to ICE or the French Culinary Institute.

During our three-hour class, we watched and followed founder and chef Micol’s instructions on how to make gnocchi, cavatelli and tagliatelle. I felt the mashed potato and the flour in my hands when making the gnocchi: I kneaded, rolled and cut the dough. I left the class feeling like I could do the three recipes on my own.

This is my first attempt in trying to replicate the gnocchi-making technique I’ve learned in class. I bought my own potato ricer and dough cutter for this recipe. I didn’t really want to buy any more toys for my kitchen, but the potato ricer is one of the most amazing gadgets I’ve ever come across: mashing potato will never be the same.

I think the dish turned out well even with my made-up sage cream sauce. Admittedly, my gnocchi wasn’t as light and fluffy as Micol’s, and I’m not sure if it’s because I used yellow potatoes instead of the recommended Yukon gold, or if I didn’t get the precise cup and a half measurement for the flour. But I can at least say that I’ve done it myself–there’s really no going anywhere from here except better pasta.

Ingredients:
1 1/2 pounds of yellow potatoes
1 1/2 cups of unbleached flour, plus more for kneading
1/2 stick of butter
4 sage leaves
1 cup of heavy cream
1/2 cup of Parmigiano-Reggiano cheese, grated
salt
pepper

1. Make the gnocchi. In a large pot, cover the potatoes with water and let boil under medium fire, until fork tender. Drain, peel and mash onto a clean counter surface using a potato ricer. Mix with flour and knead until smooth.
2. Cut dough into small chunks and roll each chunk into a thin snake-like shape. Cut into one-inch pieces to make gnocchi. Gather all gnocchi on a lined bake sheet and sprinkle with flour to avoid sticking.
3. Make the sage cream sauce. In a heavy skillet, melt the butter. Add the sage leaves and fry. When leaves are lightly browned, add the cream and the cheese with some pepper. Stir continuously with a whisk until well combined.
4. In the meantime, cook the gnocchi. Put a pot of water to boil with some salt. Add the gnocchi and wait for them to float to the surface. Scoop the gnocchi using a slotted spoon and transfer to a sieve and then to a plate. Pour enough cream just to slightly cover the gnocchi.

Related post/s:
Sign up for a pasta-making class at Rustico
My first attempt in making gnocchi wasn’t too successful
Sage ice cream recipe

Porchetta with Fennel

I don’t know how a planned dinner for three in my Harlem apartment turned into a pre-holiday dinner for seven, but that happened one Sunday night as soon as Mother Nature confirmed it was autumn in New York City. Our friend Marisol, who moved to Florida for work earlier this year, was in town for a meeting. Grabbing the opportunity to see her before the holiday craziness begins, I invited her over for dinner with Lily. Since the three of us were the only single ones in our group, I figured they would be the easiest to make plans with on short notice. It turned out that even the new moms who live in New Jersey were able to make some time to come over for dinner, tiny babies included.

I bought two boneless pork shoulders that were already tied up. After distributing the seasoning on the pork, I simply rolled and tied the pork back up; the tied-up pork should resemble a log. Adjust the cooking time to 2 hours if you’re feeding a large group like I did because the meat will compete for the oven’s heat. If you see the pork drying up halfway through, you’ll need to add some more broth in the roasting pan, so keep extra broth handy. If you think the ends are good enough to eat, feel free to remove the pork from the oven and slice off the ends after it rests; put back the rest of the pork in the oven to cook the middle part. By the way, refrain from opening the oven when you check–I just turn the oven light on when I need to take a peek at whatever I’m cooking. This saves the oven from needing to heat again.

Ingredients:
1 boneless pork shoulder, about 3 pounds, trimmed
salt
pepper
fennel fronds from one fennel bulb, roughly chopped
3 garlic cloves, minced
rosemary from 3 stalks
1 tbsp fennel seeds, grounded
2 tsps red pepper flakes
2 cups chicken broth

1. Preheat the oven to 300º. On a large cutting board, untie the pork shoulder and lay flat. Season the pork liberally with salt and pepper.
2. In a small bowl, combine the fennel fronds, garlic, rosemary, fennel seeds and red pepper flakes and sprinkle two-thirds of the mixture over the pork. (Reserve one-third of the mixture.)
3. Roll the pork up tightly. Using butcher twine, tie the pork every few inches. Season the outside of the pork with the reserved herb mixture and salt and pepper.
4. Place the pork in the center of a rectangular roasting pan and pour the chicken broth around it. Roast the pork until well browned and an instant-read thermometer registers 150º, about 1 hour and 15 minutes. Remove to a chopping block and let stand for 10 minutes before slicing. Serve immediately.

Related post/s:
Serve this porchetta with my favorite Brussels sprouts salad

Coconut-Fish Curry

I have been craving Indian flavors ever since I came back from Portugal. For our last night in Lisbon, we had dinner at a Goan restaurant and celebrated our stay there with our last bottle of Vinho de Verde. For the first time in a long time, I connected what I learned in school with my travels and remembered how Vasco da Gama traveled far through strange waters to look for those spices favored by the royal families of the Age of Discovery. He brought back to Portugal the exotic flavors from India and influenced trade–and Portuguese cuisine–forever. It wasn’t all smooth: he wanted all Muslims expelled from a Hindu land. Today in Goa, India, a city is named after him.

For this recipe, I tried both cod and albacore fish fillets and steaks. The albacore was more firm and withstood the simmering, but since cod fillets are easier to find and has a sweeter flesh, I’m using it here. (If you use albacore, or another firmer fish like monkfish, add 5 minutes to cook the fish through without overcooking.)

May I also mention that buying 1 stalk of lemongrass and two chiles from Whole Foods cost me a mere 16 cents? The scale couldn’t even register the chiles because they were paper-light, so the clerk just weighed all three items together. (The lemongrass goes for a ridiculous $9.99 per pound! It’s about $1 for five stalks in Chinatown.) It was my record: least expensive grocery tab ever!

Ingredients:
3 pieces of cod fillets
juice from 1 lime
salt
4 cloves of garlic
a small knob of ginger, peeled, thinly sliced
oil
small red onion, thinly sliced
1 lemongrass, chopped in 1-inch pieces, smashed with your knife handle
1 Thai chile
a dash of turmeric
half a can of coconut milk
parsley, finely chopped, optional

1. A few minutes before starting to cook, pat the fish dry with paper towel and transfer to a shallow bowl. Season with lime juice and salt and leave standing for 15 minutes. (You can do this the night before; just cover and store in the fridge.)
2. Using a mortar and pestle, grind garlic and ginger to a paste. Set aside.
3. In a large skillet, heat some oil and sauté onions until soft. Add lemongrass and the garlic-ginger paste and sauté until brown. Toss in chile. Season with turmeric and mix well. Add the coconut milk and the fish and simmer, covered, for 10 minutes, turning the fish halfway through. (Smash the chile here for extra spice.) Sprinkle with parsley before serving with warm rice.

Related post/s:
Kona Blue kampachi with coconut cream sauce
Fish with coconut milk, the Filipino way