Gamjatang, Korean Rib Soup

After a harrowing ten-hour trip from Chicago, the Dr. was craving kalbi-tang, or Korean short beef rib soup, the next day. We had stopped by Joong Boo Market on Belmont Avenue before we continued to the airport and among our purchase was a package of fresh perilla leaves. I thought of gamja-tang, pork rib soup, because it’s what I always order when I’m in Hanbat in Koreatown. I ended up buying short beef ribs and beef neck bones and then using a pork-rib recipe. I think combining the two soups in this one recipe was a pretty good compromise even though Maangchi may slap my hand if she ever reads this.

If we knew we were to spend all afternoon and all night trying to fly back to New York City–our flight was cancelled without any notification and all 180 passengers were vying for the next three flights to La Guardia–we would have bought the soups from the market’s deli and enjoyed them at the airport.

Finally home and caught up on sleep the next night, I searched for online recipes for both soups. All of them require boiling the bones and then rinsing them before boiling again. This step removes all the impurities and the fat from the boiled bones, but it’s sacrilege if you’re Filipino because it’s the fat that makes my people’s soups whole. Sometimes though, I do what I’m told even if the order comes from an older Korean lady. To keep my stubborn streak however, I skipped an extra rinsing step so at least some of the fat is preserved in the broth.

Needless to say, I scared the crap out of the Dr. who was impressed with how the soup turned out: he had two full large bowls for dinner while the negative aspect of our Chicago trip dissolved in pieces.

Ingredients:
5 short beef ribs, rinsed
4 beef neck bones, rinsed
5 perilla leaves, chopped in 1-inch pieces
1 napa cabbage, sliced into 4 pieces
2 potatoes, peeled, sliced
1 bunch of scallions, chopped
4 pieces dried shiitake mushrooms
1 large knob of ginger, peeled, chopped
1 yellow onion, quartered
2 tbsps soy bean paste

Sauce:
5 perilla leaves, chiffonade
6 cloves of garlic, minced
a dash of hot pepper flakes
2 tbsps hot pepper paste
4 tbsps cooking wine
3 tbsps fish sauce

1. In a large Dutch oven, boil some water. Add the beef ribs and neck bones. Lower the heat and let impurities rise to the top. Using a strainer, remove the impurities and discard. Simmer beef for a total of an hour before rinsing them out with cold water.
2. In the same washed Dutch oven, return the beef with some more water. Add ginger, onion, soy bean paste and mushrooms. Simmer for another hour.
3. In the meantime, in a separate pot, boil some water and blanch the cabbage for a minute. Remove from the pot, squeeze out the water and set aside.
4. Make the sauce as well while you’re boiling the beef. Combine all sauce ingredients and mix thoroughly. Set aside until needed.
5. When the beef is done, remove the mushrooms and let cool. Slice them and return to the pot with the rest of the vegetables. Cook for another 30 minutes in low-medium fire to make sure most of the meat is falling off the bones and the potatoes are cooked.

Related post/s:
What do you mean you don’t know who Maangchi is?
I made kalbitang before, but not as involved
I served this with my very own kimchi

Lamb Loin with Couscous

My first real night of cooking in my apartment called for one of my favorite meats: lamb. “Real” as in I’m-home-alone-for-the-first-time-in-a-long-time and I-don’t-mind-any-minute-of-it kind of real. I stopped by the halal meat market in my neighborhood where I patiently waited for the lady to slice off the loin from the whole lamb into manageable chunks. I keep coming back to this store because the lamb is crazy cheap; I just have to deal with their Island Time and re-explain how I like the ribs with the long handle bones intact and accept the fact that when I ask for ground lamb, the response will always be: I don’t have time to ground meat right now, even though I’m the only one in the store. (I have since bought my own food grinder attachment for my KitchenAid mixer.)

Look at that lamb though! They would easily cost more than $25 at Whole Foods but that lot cost me $12 here in Harlem. I don’t know enough about halal meat and still don’t know why it smells differently than, say, gourmet lamb meat from New Zealand, but they make a good meal every time.

Ingredients:
2 1/2 pounds lamb loin, cut into 1 1/2-inch pieces
1 32-ounce container low-sodium chicken broth
1 10-ounce box couscous
1 medium yellow onion, sliced
half a bag of baby carrots
1 clove garlic, finely chopped
1 tbsp grated fresh ginger
zest of 1/2 lemon, grated
a handful of cilantro leaves, roughly chopped
a handful of parsley leaves, roughly chopped
3/4 cup kalamata olives, pitted and halved
2 tsps paprika
1/4 tsp ground turmeric
1/2 tsp ground cumin
1/4 tsp cayenne pepper
1 tsp ground cinnamon
salt, oil

1. In a large resealable plastic bag, combine the paprika, turmeric, cumin, cayenne, cinnamon, salt, and 2 tbsps of olive oil. Add the lamb, seal, and shake to coat. Refrigerate for at least 1 hour and up to 12 hours.
2. Heat the remaining oil in a large Dutch oven over medium heat. Add the onion and carrots and cook for 15 minutes. Transfer to a plate.
3. Add some of the lamb to the pot and brown on all sides. Transfer to a plate. Repeat with the remaining lamb. Return the lamb to the pot along with the onion and carrots. Add the garlic, ginger, and zest and stir.
4. Add the broth and bring to a boil. Stir in the couscous. Remove from heat, cover, and set aside for 10 minutes. Stir in the cilantro, parsley, and olives.

Related post/s:
Try this meatball tagine dish when it’s a little cooler outside
I’ve come a long way in cooking tagine, don’t you think?
Still one of my favorite countries: Tunisia

The New York Times’ Bouillabaisse

I knew bouillabaisse had to be the first meal I make for the Dr. in my new apartment as soon as I saw Amanda Hesser’s recap in the New York Times Magazine. But because he’s been cooking the first few days of my unpacking, I wanted to make it up to him and make an impressive version.

After work one day, I took the train from Connecticut all the way down to Grand Central Terminal where I stopped by Pescatore and splurged on fresh seafood. When I say splurged, I really mean splurged: a quarter pound of wild shrimp cost $12, two cod fillets were $13, a chunk of halibut was $16 and two more chunks of grouper were $14. I also walked by Penzeys and spent another $16 on a few strands of saffron. I have an educated guess that they were really stringed by some ladies in Spain where as the $3 jar I buy in Harlem isn’t really saffron, but safflower. A stop at Zaro’s got me my least expensive purchase of the early evening yet: $3 load of country bread.

Back at home, I was pretty impressed at what I unpacked. The cuts of fish were absolutely beautiful. I don’t spend as much money when I cook fish at home; I usually just buy a live swimming fish from Chinatown or a whole red snapper or branzino from Fairway or Whole Foods and I just broil them without any fuss. You may think it’s a waste to cook such good fish, but I actually tried this same recipe using frozen fish from Trader Joe’s and I must tell you that it really wasn’t the same. The frozen version was bland and the fish didn’t feel supple in my mouth. In fact, I had to season more to give the Trader Joe’s bouillabaisse some kind of taste. While the seafood broth carried the frozen version, I needed only a splash to bring out the natural flavors of the fresh seafood for the Pescatore version.

Now that I’ve had Pescatore seafood, I think I’ll be making more seafood dishes more often, even if it means an ache in my wallet once in a while.

Ingredients:
1 chunk of halibut fillet
2 fillets of cod
1 chunk of grouper fillet
1/4-pound of shrimp, peeled, deveined
2 medium tomatoes, halved
1 cup of seafood broth
1/2 cup of white wine
1 small onion, thinly sliced
half a bag of baby carrots
2 pinches saffron
1 bay leaf
4 sprigs parsley, finely chopped
2 cloves garlic, minced
juice of 1/2 lemon
olive oil, salt, pepper
slices of country bread, toasted

1. In a large Dutch oven, heat the oil over medium-high heat. Add the tomatoes, onion, carrot, saffron, bay leaf and half of the parsley. Sauté for a couple of minutes and then add the garlic to brown.
2. Add the fish, shrimp and lemon juice, season with salt and pepper and toss for 10 minutes. Add the broth and wine, bring to a rapid simmer and cook until the fish is just cooked through, less than 10 minutes. Adjust the seasoning, adding more saffron, lemon juice, salt and pepper as desired. Sprinkle with remaining parsley. Set a slice of toast in the bottom of a bowl and ladle in soup.

Related post/s:
Bring your wallet and buy some good fish from Pescatore at the Grand Central Terminal Market
For a little bit of summer, try Kona Kampachi with coconut and apples

Whole Wheat Pasta with Beet Greens

I didn’t know that the apartment I bought came with a Korean cook. I can’t even begin to explain how it feels like to come home–your own home–from work with dinner ready at the table.

Uh-oh, I’m nesting!

I came home one night and the Dr. was already working in the kitchen. The beets were already roasted and out of the oven and the pasta was in the pot. When I saw him clean off the grit from the beet greens, I knew the roasted beets were for later. I’ve seen him do this before and it’s from him I learned not to waste food parts that most people throw away. I was excited for the next day’s lunch of beets, but I was even more hungry for the pasta with beet greens for dinner.

I’m not complaining. Best apartment ever!

Ingredients:
beet greens with stems from 2 bunches of beets, thoroughly washed, chopped in half
1 box of whole wheat spaghetti
a handful of golden raisins
1/2 cup pitted brine-cured black olives, coarsely chopped
1/3 cup pine nuts
1 medium red onion, thinly sliced
3 cloves of garlic, minced
3 tbsps balsamic vinegar
goat cheese
salt, oil

1. In a pot, boil some water and cook the pasta until al dente. You’re going to need some of that pasta water in steps 3 and 4. Drain and set aside.
2. Heat some oil in a skillet over medium heat. Add pine nuts and toast, stirring, until golden, about 2 minutes. Transfer to a plate with a slotted spoon.
3. Add garlic to remaining oil and cook until golden. Add onions until soft. Add balsamic vinegar and stir until most of it has evaporated, about 2 minutes. Add beet stems, some pasta water, and a dash of salt. Cover and cook for about 10 minutes or until stems are tender.
4. Add raisins, then beet greens, while stirring with tongs until leaves are wilted. Do in small handfuls if you have a small skillet. Add a splash of pasta water and cover to cook the greens, about 2 minutes. Add olives, then the cooked pasta, just until liquid has thickened slightly. Sprinkle with pine nuts and add a dollop of goat cheese before serving.

Related post/s:
Don’t waste your carrot tops either

SousVide Supreme

I’ve been M.I.A. for the last seven and a half weeks so it’s great to be writing again. I’m now moved in to my new apartment–all boxes have been unpacked and the contents reorganized. I’m extra proud of my kitchen because I’ve made it my own even though I had to work with a lot of limitations (co-op rules and, not to mention, my dwindled budget). After sixteen years in New York City, I’m glad to finally call something my own.

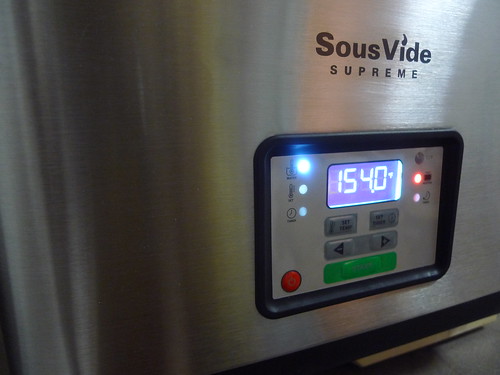
When the SousVide Supreme was delivered to my door, I was afraid to open up yet another box of something. It sat in the kitchen with all my other stuff until I was finally comfortable enough to cook amid the chaos. It was honestly the perfect machine for someone as busy and scattered as I was. All I had to do was fill it with enough water to submerge the vacuumed-sealed meat I was about to cook, set the recommended temperature and wait for it to be ready. The whole time I was “waiting”, I was finishing tasks I had to do, cleaning up around me and living my usual routine of work and sleep. The only heavy lifting involved is vacuum-sealing and setting aside the time to submerge the meat and remember to remove and eat it.

If you watch Top Chef, you’ve seen enough sous-vide cooking in the last year. It’s French for “under vacuum” and it’s cooking vacuum-sealed anything in a water bath set to a very low temperature. The cooking time is longer, but the temperature is consistent which may give you the impression that you really can’t mess anything up. You still can, as evidence to my duck breast story below, but with enough practice, you too can impress Thomas Keller with how evenly-cooked sous-vided meats are. (There’s your new word of the year: sous-vided!) For those who love their grill marks and roast smell–and don’t we all?–you can finish cooking by searing the meats before serving. It’s an extra step but could be worth it for presentation purposes and peace of mind.

My main concern is how much vacuum-seal bags you need to purchase when you get into this whole sous-vide craze. You’d have to buy yet another gadget for your kitchen to seal whatever you want to sous-vide, and with every piece of meat or vegetable you have to make sure that you have a bag in stock. One just has to weigh the costs of vacuum-seal bags for sous-vide against the energy spent cooking if you do it the regular way. It may be worth it if you don’t ever want to worry about correctly roasting a whole chicken ever again.

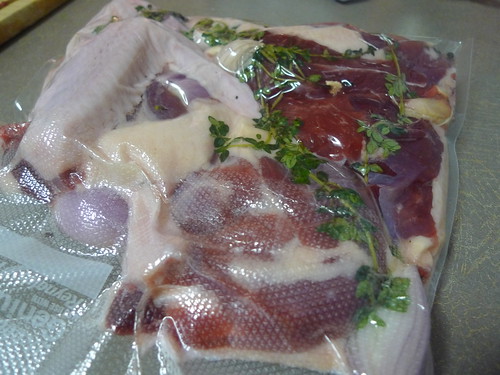
For our first try, the Dr. picked up a whole duck (I didn’t have the free time!) and we invited two of our favorite people over for dinner. The night before, we minced and mixed all the marinade ingredients together and put them all in the bag with the duck breast and the legs. Fresh thyme, bay leaves, onions and garlic with some salt and pepper were all we need. Our mistake was putting all the duck pieces in one bag. I don’t know what came over us; we’ve cooked many ducks before and it still baffles me why we didn’t think of separating the pieces so that we could remove the duck breast from the water bath hours earlier than the legs. The legs came out nicely, like confit, but the breast was tasteless and dry because we had overcooked it. Alas, there is still such a thing as overcooking even with the SousVide Supreme.

With the duck, we also sous-vided fennel, Brussels sprouts, parsnips and roasted beets. I don’t think we would have noticed the difference if we just roasted the vegetables like we usually do, but it certainly didn’t hurt that we added them in the mix.

If it ruined our duck breast, I wondered what it would do to chicken breast. I mixed some of the herbs and spices I already had in my cupboard and sous-vided four boneless chicken breasts for almost five hours. The result was very moist meat that stayed moist even after two days in the fridge. We ate the chicken as they were that night, but ate the leftovers the day after and the next and I couldn’t believe how moist they still were. Just for that, I would love to own my own SousVide Supreme so I can begin to love chicken again.

If there is one thing I need to correct when I sous-vide chicken however, it would be to make small incisions all over the meat before I seal them in a bag. Although cooked for several hours, there was still a watery bloodbath as soon as we sliced the meat the first time. This was no big deal to me but it could turn off a lot of diners.

I’ve also had sous-vide eggs before and I wanted to recreate how full and yellow the yolks were while the whites stayed delicately soft. Sure it’s easier and quicker to just soft-boil them, but with the SousVide Supreme, there is no need to worry that your soft-boiled eggs will become hard-boiled eggs. They were perfectly custardy and set beautifully against frisée and mixed greens. Is it worth spending an hour cooking eggs? Probably not, but you’d have to be a super geek about your food to appreciate how pretty soft-boiled eggs could be.

We unfortunately didn’t have enough time to try it with beef, lamb or pork which was inexcusable because I actually already had Korean beef ribs marinating in the fridge. I had to return the SousVide Supreme back to its rightful owners. Clean-up was almost non-existent. I poured out the water and wiped the inside of the machine dry with a kitchen towel. It as fun as long as it lasted.

Did I mention that I just moved in to a new apartment and could use a housewarming present? I have the perfect counter space for it.

Related post/s:
Welcome to my new home in Harlem, New York

Recommended tool/s:
The SousVide Supreme is available for you home cooks for under $500