Crispy Pigs’ Ears Salad

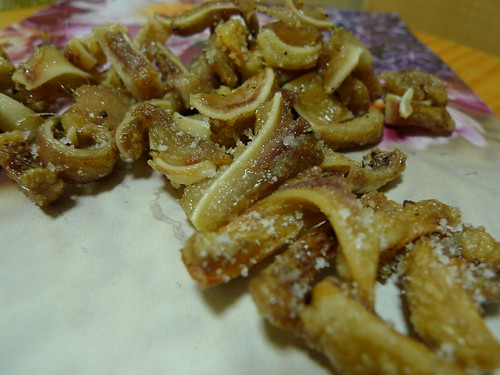
I’ve made pigs’ ears salad at home before, but this version is crispier, saltier and more perfect with beer. This is for my friend, Hafeez, who liked the Irving Mill version a lot when we ate there. At home, I fried the ears in really hot oil while standing on a short step-ladder. I wanted to be as far away from the skillet as much as possible, but I also wanted to see how the ears were cooking. It must have been a sight because my father stayed to watch me avoid getting splattered by very hot oil.

After you’ve fried the first batch of pigs’ ears, you want them to stay crispy while you finish the rest. Don’t cover the skillet when frying because that will trap moisture in. I used a slotted spoon to remove the fried ears and I transferred them to a stainless steel colander to drain the excess oil. You don’t want to use paper towels like usual because the ears will end up sitting on moist paper while you finish cooking.

You can use almost any bitter greens for this salad to stand up to the salty fried pigs’ ears. I used spinach, but spicy arugula, endive or radicchio are great substitutes.

Ingredients:
4 pigs’ ears, thoroughly washed
1 bunch of spinach
1 red onion, thinly sliced
half a bunch of parsley, finely chopped
oil, salt, pepper

1. In a large stock pot, cook pigs’ ears in enough boiling water to submerge them for an hour and a half. When cooked, remove and slice in strips.
2. Heat enough frying oil in a large skillet to deep-fry sliced ears. In small batches, add pigs’ ears and fry for 6 minutes. Do not cover skillet. When fried, use a slotted spoon to remove ears from hot oil and into a colander to drain excess oil. Sprinkle with salt and pepper while fried ears are hot. Set aside to cool.
3. Assemble salad when ears are almost cool enough to eat. Toss ears with remaining ingredients in a large salad bowl. Season with pepper.

Related post/s:
Try a less crispy pigs’ ears salad with red wine dressing and chives
Try a pigs’ feet salad recipe

Roasted Beets with Poached Egg Salad

I miss my routine of going to work, heading to the gym after and then meeting up with friends for food and drinks before the night ends, but I can’t say it has been all bad while I’ve been unemployed. Sure my savings account is dwindling, but I’ve also started to cherish the days when I can catch up with reruns of Bizaare Food, The Real Housewives of Orange County and The Bachelor. The best days have been those quiet afternoons where I can make myself a meal and then head over to a museum and enjoy the space without the crowd. This is one of the meals I made myself last week.

You can roast the beets a day or two ahead. After peeling, transfer the whole beets in a bowl, cover with plastic wrap and store in the fridge until ready to use. Poaching the egg is the most challenging but really easy. Once you try it, I swear you’ll add a poached egg to every salad you make.

Ingredients:
2 red beets and 2 golden beets, tops cut off
1 endive, sliced
2 ribs celery, chopped
4 leaves of green lettuce, chiffonade
1 egg
1/4 cup of vinegar
oil, salt, pepper

1. Wrap beets in aluminum foil and roast in the oven for about 1 hour or until you can prick each beet with a fork without too much effort. Remove from the oven and set aside. When cool enough to handle, peel using a paring knife or a peeler and then chop in small wedges.
2. Poach the egg when ready to assemble the salad. Fill a deep skillet with 2 cups of water. Add vinegar and a pinch of salt and place over high heat. Crack egg into small shallow bowl. When water boils, reduce heat to a rolling boil and gently pour in the egg. Cook until whites are firmly set. Remove egg with a slotted spoon and set aside on a plate. Keep it on the slotted spoon until ready to serve.
3. Assemble the salad. In a large bowl, combine all vegetables with roasted beets. Season with salt and pepper. Drizzle with olive oil and toss until well-combined. Serve salad on a plate with poached egg by carefully placing it on top.

Related post/s:
I’ve come a long way since I poached my first egg

Turkey Leg and Wine Stew

How to get rid of one of the most awful wines I’ve received as a gift? Okay, to be fair, it was from one of those exchange gift things last Christmas when no one really knew who’s getting which. But two bottles of wine seemed like a good deal to me, so I picked them up and never let go until everyone had claimed one of their own. Unfortunately, it was like drinking liquid jam. One sip later, I knew the rest was going to be used for cooking.

At Fairway, I found a large turkey leg for $3.50. I never really deal with turkey unless it’s November, but I couldn’t really spend any more than what the bad wine was worth. I picked up one package and had the butcher chop it in three smaller pieces. I threw in a pound of green beans, also on sale for $1.99, and the remaining bacon from the fridge. Talk about cooking for less, but good. Top this with a fried egg and you’re good to go.

Ingredients:
1 turkey leg, chopped in thirds
1 pound green beans, stringed, chopped in half
2 cups of wine
2 slices of bacon, chopped
3 cloves of garlic, minced
1 red onion, chopped
2 tbsps hot paprika
half a bunch of parsley, roughly chopped
oil, salt, pepper

1. In a large Dutch oven, cook bacon to render some fat. Remove browned bacon and set aside. Using the rendered fat, brown turkey legs, about 5 minutes each side. Remove from pot and set aside.
2. In the same pot, add some extra oil. Sauté garlic until light brown and onions until soft. Add green beans with paprika and toss to cook for about 5 minutes. Add back bacon and turkey leg pieces. Season with salt and pepper. Add wine and simmer, uncovered, for 5 minutes.
3. Add 2 cups of water to the pot and continue to simmer, covered, for 45 minutes. Toss in parsley, mix to combine well, and turn off the heat and serve.

Related post/s:
I cook more duck than turkey
I really do

Banana Bread

I ended up doubling the ingredients here to fill a silicone mold and a 4×8-inch loaf pan. The good thing is that you don’t need a mixer; just a strong arm and a wooden spoon. Keep the measurements precise and I promise it will be the best banana bread you’ll ever bake.

I filled the silicone molds more than halfway and the cooked banana bread puffed up, making their own muffin-like tops. I sliced the tops off and I had these cool-looking banana bread bars. Because I baked late in the afternoon, I could only distribute the tops to save the end-products for the next day’s photo shoot and that reminded me of one of my favorite Seinfeld episodes.

Ingredients:
4 ripe bananas, smashed
1 1/2 cups all-purpose flour
1/3 cup butter, melted in microwave; some more to butter the loaf pan
3/4 cup sugar
1 egg, beaten
1 tsp vanilla
1 tsp baking soda
a pinch of salt

1. Preheat the oven to 350ºF. With a wooden spoon, mix butter into the mashed bananas in a large mixing bowl. Add the sugar, egg and vanilla. Toss in the baking soda and salt. Keep mixing. Lastly, add the flour and continue to mix until well-combined.
2. Pour mixture into a buttered 4×8-inch loaf pan. Place the loaf pan on a baking sheet and transfer in the oven and bake for 1 hour. Cool completely on a rack before slicing to serve.

Related post/s:
JB Prince has all the silicone molds you’ll ever need
My first time baking something fancy

Cioppino, Italian Seafood Stew

Here’s another Italian recipe I butchered. Cioppino is a traditional Italian stew using the catch of the day and I used all the seafood I “caught” from the sea-permarket (ha!) except for fish because my mother is allergic; otherwise I would choose monkfish fillets to have something very meaty and tender. The clams and mussels are perfectly cooked here, but that also means they didn’t get enough time in the hot broth, so I think clam juice in a can is an absolute necessity. If your eaters are not fussy, using shrimp with their heads on can add more natural flavor to the soup. I also decided to skip the pasta in my version and opted to serve it with a few slices of toasted baguette.

Ingredients:
1 lb squid, cleaned, sliced in small rings
1/2 lb shrimp, heads on, sprinkled with salt and pepper
12 littleneck clams
12 mussels, bearded
1 cup white wine
1 medium can of crushed tomatoes
1 small can of clam juice
a handful of parsley, roughly chopped
a few pieces basil leaves, chiffonade
6 cloves garlic, minced
1 tbsp white sugar
1 tsp red pepper flakes
salt, pepper, oil
1 small baguette, sliced, toasted

1. In a large Dutch oven, heat some oil. Cook the shrimp for 3 minutes. Remove to a large bowl.
2. In the same pot, sauté garlic with red pepper flakes until golden brown. Add white wine and 1/2 cup of water. Simmer in low fire.
3. Add clams and cover. Simmer for 3 minutes. Clams are cooked when they are open. Discard those that didn’t open. Remove to a large bowl. Add mussels to the pot and cover. Simmer for 5 minutes. Mussels are also cooked when they are open. Discard those that didn’t. Remove to the same bowl with the clams.
4. Add clam juice, tomatoes and 3 cups of water to the pot with all the seafood and wine flavor. Let simmer for about 20 minutes while occasionally stirring. Add squid and cook for 2 minutes. Add back the shrimp, clams and mussels and carefully toss together with the tomato broth. Remove from heat. The squid will finish cooking in the remaining heat. Ladle in big open bowls and serve with toasted baguette.

Related post/s:
Moules marinieres recipe
Cockles in white wine sauce recipe