Soba Noodles with Miso-Pickled Ginger Dressing

For the pickled ginger in this recipe, you can buy the pre-packaged ones from your Asian market–it’s the kind you eat with your sushi–or easily make your own if you have a few extra hours to marinate. I’ve included that recipe below just in case.

When assembling the dish, I tossed all the vegetables with the dressing first before I folded them in with the soba noodles because I didn’t want the noodles to break and get soggy. Serve this cold and you’ll have a nice salad to eat for your Meatless Whatever-Day of the week.

For the pickled ginger:

Ingredients:
1 large knob of ginger, peeled, thinly sliced
1 cup rice vinegar
1/4 cup of white sugar
1 tsp salt

1. In a small pot, bring water to a boil. Then add the ginger and cook, stirring once or twice, to soften it, about 30 seconds. Drain the ginger in a strainer, separating the pieces with chopsticks so they drain well. Transfer the ginger to a bowl and let stand.
2. In another separate pot over medium heat, combine the vinegar, sugar, and salt. Stir until the sugar and salt dissolve, then increase the heat to medium high and bring to a boil. Remove from the heat. Pour in the vinegar mixture to completely cover the ginger in the bowl. Let stand for a couple of hours, or overnight.

For the soba:

Ingredients:
2 tbsps white miso paste
2 bundles of soba noodles
1 tbsp sesame oil
1 tbsp rice vinegar
pickled ginger
1 medium carrot, cut into matchsticks
1 small head radicchio, thinly sliced
2 scallions, chopped
1 sheet toasted nori, torn
2 tbsps toasted sesame seeds

1. Cook soba noodles according to package directions. Rinse under cold water, drain, and place in large colander.
2. Blend miso, sesame oil, rice vinegar, pickled ginger, and about 3 tbsps of water in a blender until smooth.
3. Pour in the miso-pickled ginger dressing in a large mixing bowl. Stir in carrots, radicchio, green onions, nori, and the sesame seeds until well-combined. Fold in the soba noodles and toss gently.

Baked Brie with Apple Compote

When I first tasted this dessert at my friend Rey’s house, I immediately had to have the recipe. I was surprised that it came from Williams-Sonoma but I guess that makes sense because they have to pair the wares they sell with the foods you can cook with them. (It’s not really a store I frequent.)

This has become my go-to dessert this holiday season. The combination of the Brie’s saltiness with the apple compote’s sweetness is great, and I think using green cardamom here is the standout. I just love that cinnamon was not the obvious choice.

You can make this ahead of time so you don’t have to worry about it if you’re planning on making dinner for a party. Go through all the steps until #4 and then wrap it in Saran and freeze it until you’re ready to bake. Only then do you proceed to the last step and brush the frozen pastry with egg wash before baking.

Ingredients:
1 tbsp unsalted butter
2 apples, peeled, cored and cut into 1/2-inch dice
1/4 cup sugar
1/8 tsp green cardamom, seeded, grounded
1 round Brie cheese, 6 to 8 oz
puff pastry dough, thawed ahead of time and rolled out to 1/4-inch thickness
1 egg, beaten with 1 tbsp water

1. In a small pot over medium heat, melt the butter. Add the apples and sauté, stirring occasionally, until the apples are tender, about 5 to 7 minutes.
2. Add the sugar and cardamom. Stir to dissolve and cook until most of the liquid has evaporated, 12 to 15 minutes more, while stirring occasionally. Remove from the heat and let the apple compote cool to room temperature.
3. Preheat an oven to 375º. Line a baking sheet with parchment paper.
With a sharp knife, cut the cheese in half horizontally. On a clean work surface, place one half of the cheese, sliced side up, and evenly spread 1/2 cup of the apple compote over it. Set the other half, sliced side down, over the compote and spread 1/2 cup compote over the top.
4. Place the dough on a lightly floured surface and set the cheese in the center of the dough. Fold the dough up over the sides of the cheese, pleating the upper edges to fit snugly around the cheese, like a huge dumpling. Pinch the dough together in the center to seal.
5. When ready to bake, brush the dough evenly with the egg wash and place on the prepared baking sheet. Bake until the pastry is golden all over and crisp, 40 to 45 minutes. Let it rest for 5 minutes, then transfer to a platter along with a sharp knife.

Chicken Liver Mousse

It’s the holiday season and you have been invited to a few potluck parties. What to bring? May I suggest homemade chicken liver mousse that’s sure to satisfy your friends who hover over the appetizers table and at the same time impress the adventurous eaters? Look, a lot of people will bring a wheel of Brie or a bottle of wine, and let’s admit it, sometimes you just have to be different from everyone else. So if you have the time, make this and spread the holiday cheer.

You can buy fresh chicken livers at your local Chinatown butcher, or if you’re in New York City, Fairway Supermarket, but for a buck more. The extra dollar may be worth it because the chicken livers from Chinatown almost always come with the hearts attached. Now, I’m a fan of two-for-one deals, but sometimes I just want chicken livers when I buy chicken livers. But just in case yours come looking like this photo below, you can easily trim the heart off and discard (or cook in another dish, Sichuan style; but more on that later). For good measure, I also removed the stringy stuff and just left the livers like how I remember them from grade school science class.

The original recipe required lighting the concoction with a match after adding the brandy (Step 5, below). I happily skipped that step because I didn’t need to risk burning off my eyebrows. I’m sure it wouldn’t have been as dangerous as I imagined, but my mousse turned out deliciously without doing it.

For a finer texture, you may strain the liver mousse through a fine sieve after you blitz it in the food processor. I also avoided this extra step and found my mousse quite smooth in the end. To avoid bubble-looking things on the surface when all is said and done, make sure your Saran wrap is flat when you cover the mousse before the last refrigeration step.

Ingredients:
1 pound chicken livers, trimmed and cleaned
2 cups whole milk
1 cup pitted prunes
1/3 cup red wine
2 tbsps orange juice
1 tbsp lemon juice
1 tbsp sugar
vegetable oil
1/4 cup red onion, finely chopped
1 garlic clove, finely chopped
2 tbsps honey
1/4 cup brandy
1 cup heavy cream
salt, pepper
1 medium baguette, cut into 1/4-inch slices and toasted

1. In a medium bowl, cover the livers with the milk and refrigerate for at least 5 hours or overnight.
2. In a small saucepan, combine the prunes with the red wine, orange juice, lemon juice and sugar and simmer, stirring occasionally, until the liquid has reduced to a thick syrup, about 6 minutes. Let cool and then refrigerate.
3. In another small saucepan, heat a scant of oil over moderate heat. Add the onion and garlic and cook until softened, about 4 minutes.
4. Drain the livers, pat dry with paper towels and season with salt and pepper. In a large, heavy skillet, heat a little bit more oil. Add the livers and cook over high heat until well-browned, about a minute per side.
5. Add the onion-garlic mixture, along with the honey and 1/4 cup of the brandy. Cook the livers until the brandy has thickened and reduced to a glaze, about 3 minutes.
6. Using a heatproof spatula, scrape the hot livers into a food processor. Add the cream and blend until smooth. Season with salt and pepper.
7. Transfer the mousse into a serving bowl and press plastic wrap directly onto the surface. Refrigerate for at least 4 hours or overnight. Serve the liver mousse with the toasts and prunes.

Homemade Ramen Noodle Soup

I took a lot of liberties with this ramen broth recipe and took bits and pieces from both the Momofuku cookbook and the very detail-oriented Serious Eats blog entry. I combined both and made them work according to my schedule, so bear with me as you read through my narrative and the version of steps I took.

Ingredients:
For the broth:
2 pounds chicken necks and backs
1 rack of pork baby back ribs, separated
1 large leek, halved lengthwise
2 knobs fresh ginger, peeled and thinly sliced
4 garlic cloves, sliced
shoyu, or soy sauce
dried mushrooms
oil
1 pork shoulder butt, tied
salt
1 sheet of kombu, or dried kelp

For the ramen:
fresh chuka soba, or curly noodles
bok choy, rinsed and separated
4 eggs
shoyu, or soy sauce
mirin, or Japanese rice wine
2 scallions, chopped
2 sheets of nori, torn into smaller squares
togarashi, or Japanese red chile flakes

I made the chicken stock the day before because my Rottweiler, Atticus, is currently on a diet of plain boiled rice and chicken and I have a lot of broth handy at the moment. Doing the chicken stock ahead of time actually worked well because when I removed the pot of chicken broth from the fridge, it was so much easier to scoop out the fat that formed at the top and discard it.

1. Make the chicken stock. Boil a large pot of water with the chicken bones. Scoop out the impurities that float to the top and let simmer for an hour. Remove from heat and let cool before storing in the fridge.

The next day, which is the main cooking day, I made sure the chicken broth was out of the fridge and sat in room temperature, uncovered. Then I started to make the pork broth. I used my largest Dutch oven because the chicken broth was in my other pot.

2. Make the pork stock. Boil a large pot of water with the pork ribs. Scoop out the impurities that float to the top and let simmer for an hour.
3. While waiting for the water for the pork broth to boil, I browned the leek, ginger, and garlic in a large skillet over medium fire.
4. I also soaked the dried mushrooms in a bowl of water.
5. I then added the browned vegetables to the boiling pork broth with a cup of shoyu. I scooped out the impurities that rose to the top several times while doing the next steps.
6. Meanwhile, I tied up the pork butt, seasoned and rubbed it with salt, and browned it on all sides on the same large skillet over medium fire.
7. Then I added the browned pork butt and the drained mushrooms, plus the kombu, to the broth. I kept scooping out the impurities.
8. Whenever the broth looked like it was getting reduced, I added a batch of the chicken stock to mix the two kinds together.

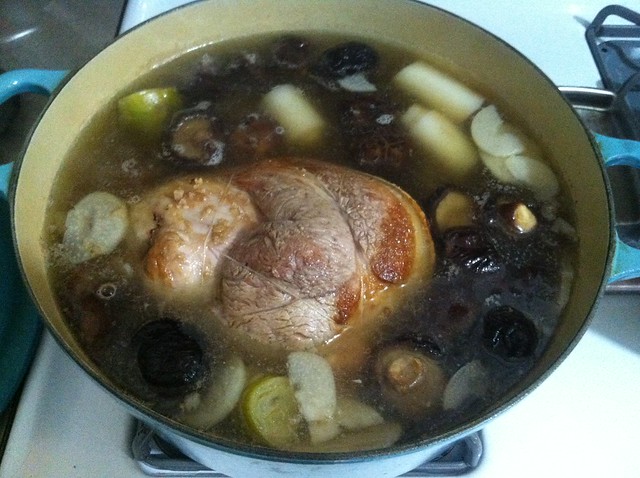
The pork and the vegetables simmered for several hours, a total of about 6. I don’t know how comfortable you are about leaving the stove on, but I ran errands outside while I had the fire in its lowest setting and the pot uncovered.

9. An hour before I thought the broth was going to be done, I prepared the ramen toppings.
10. I boiled the eggs in boiling water: 5 minutes for a runny yolk. I let them cool before peeling them.
11. I soaked the eggs in equal parts shoyu-mirin mixture.
12. I steamed the bok choy in a separate pot for about 5 minutes.
13. I sliced scallions.

A note on the soaking of the eggs, by the way. The eggs will float to the top of the shoyu-mirin mixture and that’s why you see my eggs are unevenly colored. I didn’t realize that until it was ready to slice them in half, so take a small tea cup to keep them submerged when you do it.

This next step of separating the pork meat from the bones should be easy because the meat is well-cooked. Try to be gentle and don’t let the meat disintegrate. Your ramen presentation would look better with larger chunks of pork on top.

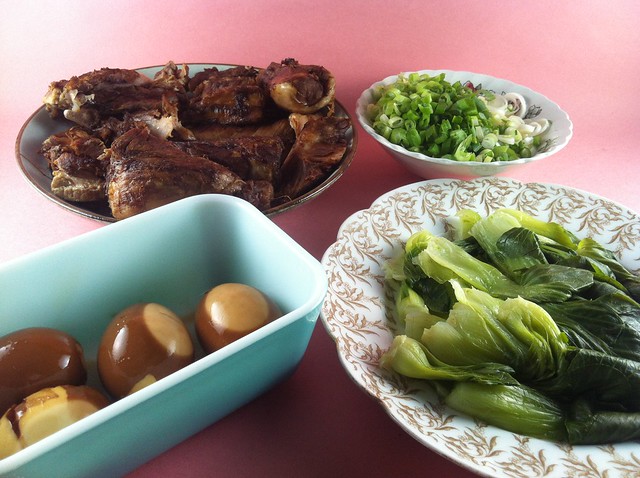
14. I removed the pork butt and the ribs from the broth onto a baking dish and let them rest. I then separated the meat from the pork butt bone and the rib bones.
15. I brushed the pork meat with shoyu and broiled them in the oven for 3 minutes to brown them.
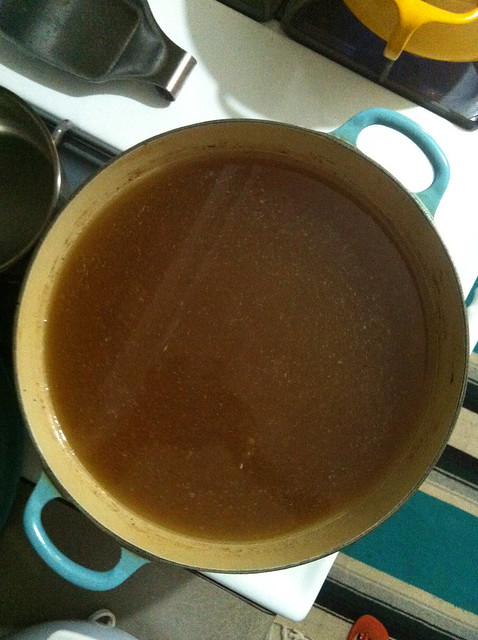
16. I removed the vegetables from the broth using a slotted spoon and discarded them. I kept the fire at the very lowest setting to keep the broth warm. Every time a film of fat would form at the top, I scooped it out to try and keep the broth clean as much as possible.

My guests started coming in and that’s when I started to cook the ramen noodles. They were served beers and gin and tonics while they waited.

17. Cook the noodles in another pot of boiling water, about 10 minutes tops so that they’re al dente. When they are done, remove to a strainer. Do not rinse the noodles.
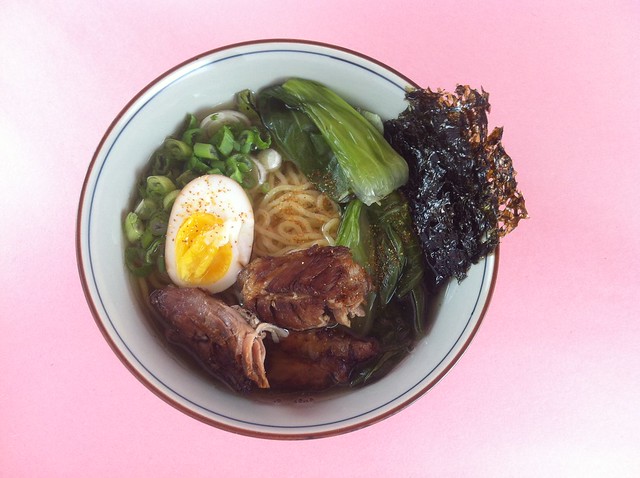
18. I assembled each ramen dish by dividing the cooked noodles among serving bowls and ladling a cup or two of broth into each one. I topped it with some bok choy. I drained the soaking eggs and cut them in half and put one half of it in each bowl. I added 2 pieces of pork meat, too. A small sheet of nori was tucked in and a smattering of scallions was added. Togarashi was served at the table with a bowl of shoyu-mirin mixture so each guest can adjust their own ramen bowl according to their taste.

And that’s that. It’s true that after all that time I spent making the broth that I felt more connected to the dish. I was proud to serve it and was very grateful when my guests appreciated the time and effort I put in.

Related post/s:
The Momofuku cookbook is always a good one to have
Serious Eats has a great Ramen Week page

Bo Luc Lac, Vietnamese Shaking Beef

I picked this Vietnamese recipe because of its name. Luc Lac means the “shaking” of the beef, or really, the tossing of the meat in a hot wok after a quick sear. I wanted a flavorful beef dish without putting too much effort in cooking. The original recipe asked for filet mignon, but I downgraded to top sirloin and sliced it in smaller pieces to cook easier and quicker.

Watercress is good as a bed for this dish, but loose spinach leaves worked just as well. The bitterness of the greens made a great contrast to the Vietnamese flavor of the beef. I also love that as soon as you add the cooked beef on them, they wilt and make them a part of the entire meal.

Ingredients:
1 lb beef sirloin, cut into 1/2-inch piece
salt, pepper
1/4 cup soy sauce
1/4 cup oyster sauce
1/4 cup white sugar
juice from 1 lime
2 tbsps butter
1 red onion, thinly sliced
2 stalks of scallion, chopped
spinach leaves

1. In a medium bowl, add the beef pieces and toss with salt. Refrigerate and let marinate for at least an hour.
2. When ready to cook, whisk together the soy sauce, oyster sauce and sugar in a bowl until the sugar has dissolved. Then whisk in the lime juice with some pepper.
3. In a large skillet over high heat, add some oil. Right before the oil begins to smoke, add the sirloin and sear, without stirring, for 1 minute. Use a spatula to turn the beef over and cook on the other side for another minute. Add the butter, soy sauce mixture, red onion and scallions. Cook, stirring often, until the meat, red onion and scallions are well coated with the sauce, about 1 minute.
4. Arrange the spinach greens on a platter and spoon the beef over the greens. Serve immediately and pour the sauce from the skillet on top to wilt the vegetables.